
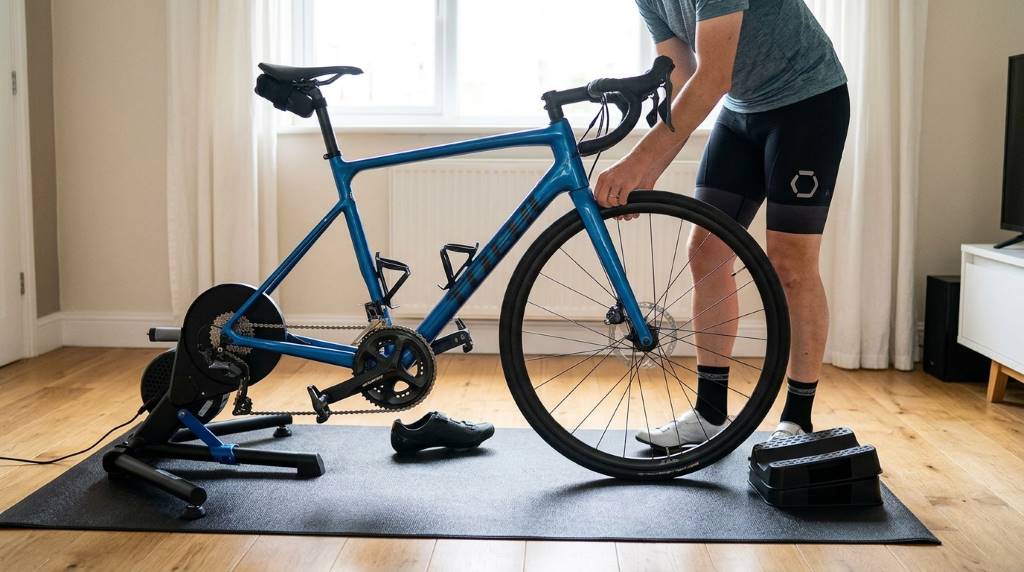
Indoor cycling has grown in popularity with over 40 million Americans now using stationary bikes. A bike front wheel riser block helps mimic outdoor riding conditions. Proper positioning ensures stability and comfort during workouts. It also reduces strain on your wrists and back.
Many cyclists overlook the importance of adjusting their bike setup for indoor training. A well-placed riser block can make a significant difference in your riding experience. This guide will walk you through the process step by step. You will learn how to achieve the best results for your indoor cycling sessions.
Why Use a Bike Front Wheel Riser Block?
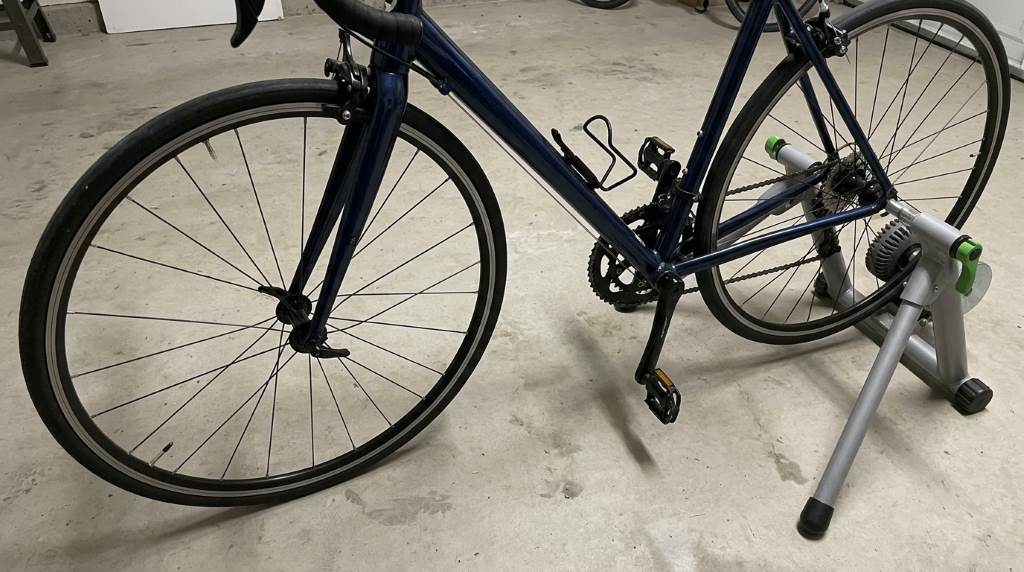
A riser block lifts the front wheel to match the height of the rear wheel. This creates a level riding position similar to outdoor cycling. It helps prevent discomfort in your lower back and wrists. Proper alignment also improves pedal efficiency.
Without a riser block your front wheel may sit too low. This can cause poor posture and reduced performance. A riser block also keeps your bike stable on the trainer. It prevents wobbling and ensures a smoother ride.
Choosing the Right Riser Block
Riser blocks come in various materials like plastic rubber or wood. Plastic blocks are lightweight and easy to adjust. Rubber blocks provide extra grip and reduce slippage. Wooden blocks are durable but may be heavier.
Consider the height of the block based on your bike and trainer. Most blocks offer adjustable heights between one to three inches. Check the compatibility with your bike tire width. A wider block provides better stability for mountain bikes.
Material Considerations
Plastic riser blocks are affordable and come in multiple height options. They are ideal for casual riders and beginners. Rubber blocks are best for intense workouts due to their non slip surface. Wooden blocks are sturdy but may require additional padding.
For humid climates like Minnesota rubber blocks are recommended. They resist moisture and provide a firm grip. Plastic blocks may become slippery in damp conditions. Always ensure the block is dry before use.
Step by Step Guide to Positioning Your Riser Block
Step 1: Prepare Your Bike and Trainer
Place your bike on a flat and stable surface. Ensure the trainer is securely attached to the rear wheel. Check that the bike is level from side to side. This prevents imbalance during your workout.
Inflate your tires to the recommended pressure for indoor use. A properly inflated tire ensures better contact with the riser block. This also reduces the risk of slippage. Always double check the tire pressure before starting.
Step 2: Determine the Correct Height
Measure the height difference between your rear and front wheels. The riser block should match this difference. Most trainers elevate the rear wheel by about two to three inches. Adjust the block height accordingly.
If your trainer has multiple resistance settings test the bike stability at each level. A higher resistance may require a taller riser block. This ensures the bike remains balanced. Always start with a lower height and adjust as needed.
Step 3: Place the Riser Block
Position the riser block directly under the front wheel. Ensure it is centered and aligned with the wheel. The block should be close enough to touch the tire lightly. This prevents the wheel from rolling off during use.
For extra stability place the block on a non slip mat. This is especially useful on hard floors. The mat also protects your flooring from scratches. It reduces noise during intense workouts.
Step 4: Secure the Bike
Once the block is in place gently lower the front wheel onto it. Ensure the wheel rests firmly on the block. Check for any wobbling or instability. Adjust the block position if necessary.
Test the bike by pedaling slowly at first. Listen for any unusual noises or vibrations. If the bike feels unstable reposition the block. Always ensure the block is flat on the ground.
Common Mistakes to Avoid
One common mistake is using a riser block that is too tall. This can cause the bike to tilt forward and create discomfort. Always start with a lower height and increase gradually. This helps you find the most comfortable position.
Another mistake is placing the block too far from the wheel. This can cause the wheel to roll off during use. Ensure the block is close enough to support the wheel. Check the alignment before starting your workout.
Overlooking Surface Conditions
Using a riser block on an uneven surface can lead to instability. Always place your bike on a flat and level area. Avoid carpets or rugs as they can cause the block to shift. A hard floor is ideal for indoor cycling.
In cold climates like Minnesota ensure the block is not exposed to extreme temperatures. Plastic blocks can become brittle in cold conditions. Store your equipment in a temperature controlled environment.
Tips for Different Bike Types
Road Bikes
Road bikes typically have thinner tires and require a narrower riser block. Ensure the block width matches your tire width. This provides better stability and support. A wider block may cause the tire to sit unevenly.
Road bikes often have a more aggressive riding position. A slightly higher riser block can help mimic this posture. Adjust the height to match your outdoor riding experience. This improves comfort and performance.
Mountain Bikes
Mountain bikes have wider tires and may need a broader riser block. This ensures the tire sits flat on the block. A wider block also provides better stability for off road simulations. Check the block specifications for compatibility.
For mountain bikes consider using a riser block with a textured surface. This prevents slippage during intense workouts. Rubber blocks are ideal for this purpose. They provide a firm grip and reduce movement.
Hybrid Bikes
Hybrid bikes combine features of road and mountain bikes. They may require a medium width riser block. Ensure the block supports the tire evenly. This provides a stable and comfortable riding position.
Hybrid bikes are versatile and can be used for various workouts. Adjust the riser block height based on your preferred riding style. This helps you achieve the best results for your indoor cycling sessions.
Advanced Techniques for Indoor Cycling
Simulating Outdoor Conditions
To simulate outdoor riding adjust the riser block height to match different terrains. A higher block can mimic climbing conditions. A lower block can simulate flat roads. This adds variety to your workouts.
Use multiple riser blocks to create a custom setup. This allows you to switch between different riding positions. It also helps you target specific muscle groups. Experiment with different heights to find what works best for you.
Using a Riser Block with a Smart Trainer
Smart trainers often have built in sensors for performance tracking. Ensure the riser block does not interfere with these sensors. Position the block so it does not block any moving parts. This ensures accurate data collection.
Smart trainers may require specific riser block heights for calibration. Check the manufacturer guidelines for recommendations. This ensures compatibility and optimal performance. Always follow the instructions provided with your trainer.
Maintenance and Care for Your Riser Block
Regularly inspect your riser block for signs of wear and tear. Replace it if it becomes cracked or damaged. This prevents accidents and ensures safety. Always check the block before each use.
Clean the riser block with a damp cloth to remove dirt and debris. Avoid using harsh chemicals as they can damage the material. Store the block in a dry and cool place. This extends its lifespan and maintains its performance.
Safety Precautions
Always ensure the riser block is securely in place before starting your workout. Double check the bike stability and alignment. This prevents accidents and injuries. Never use a damaged or unstable riser block.
Wear appropriate cycling shoes with a firm grip. This improves pedal efficiency and reduces slippage. Avoid loose clothing that can get caught in the bike mechanism. Always prioritize safety during your workouts.
Unique Considerations for Indoor Cycling in Minnesota
Minnesota’s cold winters can affect indoor cycling equipment. Store your riser block in a temperature controlled environment. This prevents damage from extreme cold. Plastic blocks can become brittle in low temperatures.
Humidity levels can vary in Minnesota homes. Use a rubber riser block to prevent slippage in damp conditions. Ensure the block is dry before each use. This maintains stability and safety during workouts.
Consider using a dehumidifier in your workout space. This reduces moisture in the air and protects your equipment. It also improves comfort during indoor cycling sessions. A dry environment is ideal for optimal performance.
Conclusion
Properly positioning a bike front wheel riser block enhances your indoor cycling experience. It improves stability comfort and performance. Follow the steps outlined in this guide to achieve the best results. Experiment with different heights and setups to find what works best for you.
Remember to prioritize safety and maintenance. Regularly inspect your equipment and replace it when necessary. This ensures a safe and enjoyable workout every time. Start your indoor cycling journey today and experience the benefits of a well positioned riser block.
FAQs
What is the ideal height for a bike front wheel riser block?
The ideal height matches the elevation of your rear wheel on the trainer usually between one to three inches.
Can I use a riser block on any type of bike?
Yes but ensure the block width matches your tire width for stability and support.
How do I prevent my riser block from slipping?
Use a rubber block or place it on a non slip mat for extra grip.
Is a riser block necessary for indoor cycling?
While not mandatory it improves comfort and mimics outdoor riding conditions.
How often should I replace my riser block?
Replace it if it becomes cracked damaged or shows signs of wear.

Welcome to outdoorxsports.com! I’m Russell, your guide to the awesome world of mountain biking. This blog is all about building a community of riders who love to share their passion for the sport. Expect inspiring stories, local trail recommendations, fun challenges, and tips for making the most of your time on two wheels.