
A slipping bike crank creates frustrating clicking sounds and inefficient pedaling. This common problem occurs when the crank arm loosens from the bottom bracket spindle. Fortunately, most cyclists can fix this issue at home with basic tools and proper techniques.
Understanding Why Bike Cranks Slip
The crank arm connects to the spindle through either a square taper, splined interface, or bolt-on system. Over time, these connections loosen from pedaling forces and vibration. Additionally, worn interfaces or improper installation cause slipping problems.
Square taper systems rely on friction between tapered surfaces. However, these gradually wear and require periodic tightening. Splined systems use interlocking teeth that can strip if over-torqued or under-tightened.
Recognizing the problem early prevents permanent damage. Therefore, addressing slipping immediately saves costly replacements. The repair process varies slightly depending on your crank type.
Identifying Your Crank Type
Before starting repairs, identify which crank system your bike uses. This determines the tools needed and repair approach. Three main types exist in modern bicycles.
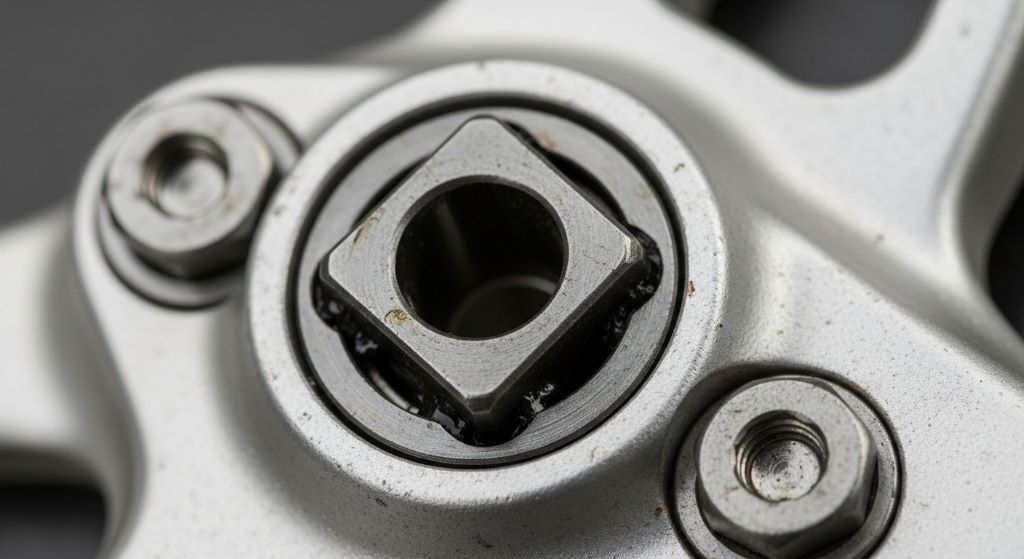
Square taper cranks feature a square hole in the crank arm that fits onto a matching tapered spindle. These older systems remain common on budget and vintage bikes. A crank puller tool is essential for removal.
Splined cranks include Shimano Octalink and ISIS Drive systems. These use eight or ten splines respectively. Meanwhile, they require specific bottom bracket tools for installation and removal.
Modern external bearing cranks like Shimano Hollowtech II and SRAM GXP use large diameter spindles. The crank arm slides directly onto the spindle and secures with pinch bolts. These systems are easiest to service.
Tools and Materials Needed
Gathering proper tools before starting ensures smooth repairs. Most bicycle multi-tools lack the specific implements required. Therefore, investing in dedicated bicycle tools proves worthwhile.
Essential tools include a crank puller for square taper systems, appropriate Allen keys or hex wrenches, and a torque wrench for proper tightening. Additionally, you need cleaning supplies like degreaser and clean rags.
Materials required include fresh grease or anti-seize compound. Some repairs need thread-locking compound for securing bolts. Moreover, having replacement bolts available helps if originals are damaged or stripped.
Park Tool and Pedro’s manufacture reliable bicycle-specific tools. According to Bicycling Magazine, using proper tools prevents damage and ensures correct torque specifications.
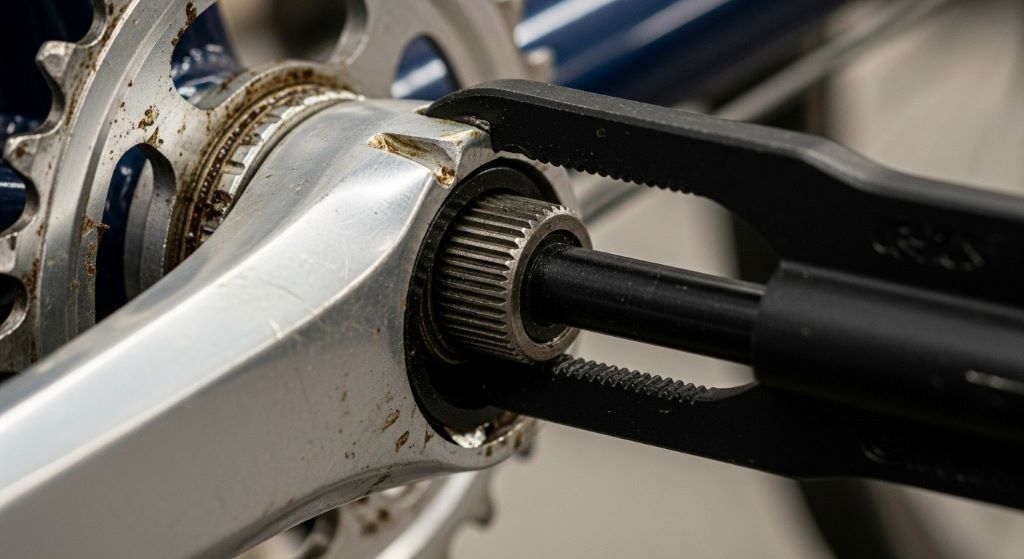
Fixing Square Taper Crank Slipping
Square taper cranks require careful attention during repairs. The tapered interface depends on precise fitting and torque. However, overtightening damages the soft aluminum crank arm.
First, remove the dust cap covering the crank bolt. Use the appropriate Allen key or socket to remove the crank bolt completely. Keep track of any washers between the bolt and crank arm.
Thread the crank puller into the crank arm until firmly seated. Ensure complete thread engagement to prevent stripping. Then, turn the center bolt of the puller clockwise to push against the spindle.
The crank arm will gradually separate from the spindle. Apply steady pressure rather than forcing it. Once removed, clean both the spindle taper and crank arm hole thoroughly with degreaser.
Inspect surfaces for damage, scoring, or excessive wear. Minor surface imperfections are acceptable. Nevertheless, deep grooves or rounded edges indicate replacement is necessary.
Apply a thin layer of grease to the spindle taper. This prevents corrosion and aids future removal. Slide the crank arm onto the spindle, aligning it opposite the other crank.
Install the crank bolt with its washer. Tighten gradually by hand first. Then, use a torque wrench to achieve manufacturer specifications, typically 30-40 Newton-meters. Therefore, proper torque prevents both slipping and damage.
Repairing Splined Crank Systems
Splined systems like Octalink and ISIS require different approaches. These cranks use pinch bolts or crank bolts to secure the arm. Additionally, the splined interface must align perfectly.
Remove the pinch bolts or crank cap first. Some systems have a preload cap that sets bearing adjustment separately from the fixing bolts. Carefully note the disassembly sequence for proper reassembly.
Pull the crank arm straight off the spindle. Most splined cranks slide off without pullers. However, stubborn cranks may need gentle tapping with a rubber mallet.
Clean all splines thoroughly on both the spindle and crank arm. Metal shavings or dirt prevent proper engagement. Use a stiff brush and degreaser for complete cleaning.
Examine the splines for wear or damage. Worn splines appear rounded rather than sharp-edged. Moreover, any play when the crank is installed indicates replacement is needed.
Apply a small amount of grease to the splines. Slide the crank arm onto the spindle, ensuring complete spline engagement. The crank should slide on smoothly without forcing.
Install and hand-tighten the fixing bolts. Then torque to manufacturer specifications, usually 35-50 Newton-meters depending on the system. Check that the crank rotates smoothly without binding.
Fixing External Bearing Crank Slipping
External bearing cranks like Hollowtech II represent the easiest systems to service. The large spindle diameter provides excellent stiffness. However, pinch bolts must be properly torqued.
Loosen the two pinch bolts on the non-drive side crank arm. These typically use 5mm Allen keys. Remove the bolts completely and set them aside safely.
The non-drive crank arm slides straight off the spindle. No special tools are required. Additionally, the drive-side crank usually remains installed during this repair.
Clean the spindle where the crank arm interfaces. Remove any dirt, grease, or corrosion with degreaser. The crank arm bore also needs thorough cleaning.
Inspect the spindle for scoring or damage. The crank arm bore should be smooth and round. Therefore, any visible damage indicates component replacement is necessary.
Apply a thin film of grease to the spindle. This prevents galvanic corrosion between aluminum and steel. Slide the crank arm onto the spindle until it seats completely.
Install the pinch bolts and tighten in a cross pattern. First, snug both bolts evenly. Then, torque each bolt to specifications, typically 12-14 Newton-meters. Moreover, recheck torque after the first ride.
Preventing Future Crank Slipping
Regular maintenance prevents crank slipping problems. Check crank bolt tightness monthly during riding season. Additionally, annual complete disassembly allows thorough inspection and cleaning.
Apply proper torque during installation. Under-tightening allows movement and wear. Conversely, over-tightening damages aluminum threads and crank arm interfaces. Therefore, investing in a torque wrench proves essential.
Clean and regrease crank interfaces annually. This prevents corrosion and binding. Use appropriate lubricants for your climate and riding conditions.
Avoid riding with loose cranks. The movement causes rapid wear to precision-machined surfaces. Furthermore, continued use with slipping cranks risks sudden failure during hard pedaling.
Listen for clicking or creaking sounds during rides. These often indicate developing problems. Addressing issues immediately prevents expensive repairs later.
When to Seek Professional Help
Some situations require professional bicycle mechanic expertise. Stripped threads in crank arms cannot be repaired at home. Additionally, damaged bottom bracket bearings need proper pressing equipment.
If crank arms repeatedly loosen despite proper torque, replacement is likely necessary. Worn tapers or stripped splines compromise safety. Therefore, professional assessment determines whether components can be salvaged.
Unusual noises persisting after proper tightening indicate other problems. Bottom bracket bearing wear or frame damage requires expert diagnosis. Moreover, professionals have specialized tools for difficult repairs.
Carbon fiber cranks demand extra care during installation. Improper torque or installation damages expensive components. According to Popular Mechanics, carbon components benefit from professional service.
Troubleshooting Persistent Slipping Issues
Sometimes cranks continue slipping despite proper installation. Several underlying problems cause persistent issues. Systematic troubleshooting identifies root causes.
Damaged or worn bottom bracket spindles prevent secure crank attachment. Replace the entire bottom bracket if spindle wear is evident. This ensures proper interface geometry.
Cross-threaded or stripped crank arm holes cannot hold bolts securely. Helicoil inserts sometimes repair damaged threads. However, replacement often proves more reliable and cost-effective.
Incompatible components cause fitting problems. Verify that your crank arms match the bottom bracket spindle type. Additionally, check that bolt lengths are correct for your specific system.
Frame damage around the bottom bracket shell affects alignment. Crashed or overtightened bikes sometimes suffer permanent frame deformation. Therefore, professional frame inspection becomes necessary.
Cost Considerations for Repairs
DIY crank repairs save significant money compared to shop service. Basic tools cost between 30 and 80 dollars initially. However, these tools last for years of maintenance.
Professional repairs typically cost 25 to 50 dollars for labor. Additionally, shops charge for parts and supplies. Simple tightening might cost less, while complete overhauls run higher.
Replacement cranks range from 40 dollars for basic square taper systems to 300 dollars for high-end external bearing sets. Bottom brackets cost 15 to 150 dollars depending on type and quality.
Weighing repair versus replacement depends on component condition. Worn square taper interfaces often justify complete upgrades. Meanwhile, minor slipping on newer cranks usually needs only proper tightening.
Conclusion
Fixing a slipping bike crank requires identifying your crank type, gathering appropriate tools, and following proper procedures. Square taper systems need careful torquing after cleaning worn surfaces. Splined and external bearing cranks demand precise alignment and correct bolt tension. Regular maintenance prevents future problems, while immediate attention to slipping saves expensive component replacement. Therefore, most cyclists can successfully perform these repairs at home with basic tools and patience.
Frequently Asked Questions
Can I ride my bike with a slipping crank?
No, riding with a slipping crank causes rapid wear to the spindle and crank arm interface. This movement can strip threads, damage tapered surfaces, and potentially cause sudden failure during hard pedaling, risking injury.
How tight should bike crank bolts be?
Crank bolt torque varies by system. Square taper cranks require 30-40 Newton-meters, splined systems need 35-50 Newton-meters, and external bearing pinch bolts need 12-14 Newton-meters. Always consult manufacturer specifications and use a torque wrench.
Why does my crank keep coming loose after tightening?
Persistent loosening indicates worn interfaces, damaged threads, incompatible components, or incorrect installation procedures. Inspect all surfaces for wear, verify component compatibility, and ensure proper torque specifications are applied during installation.
Do I need a torque wrench to fix a slipping crank?
Yes, a torque wrench is essential for proper crank installation. Under-tightening allows continued slipping while over-tightening damages aluminum threads and interfaces. Proper torque ensures secure attachment without component damage.
How often should I check my crank bolts?
Check crank bolt tightness monthly during active riding season. Additionally, inspect cranks after crashes, hard riding, or any time unusual noises develop. Annual complete disassembly allows thorough cleaning and inspection of all interfaces.
Related Topics:
TCT-Motorparts youth mx helmet guide (carbon fiber)
Dialing In Your Ride: The Unseen Impact of Temperature on MTB Tire Pressure

Welcome to outdoorxsports.com! I’m Russell, your guide to the awesome world of mountain biking. This blog is all about building a community of riders who love to share their passion for the sport. Expect inspiring stories, local trail recommendations, fun challenges, and tips for making the most of your time on two wheels.