
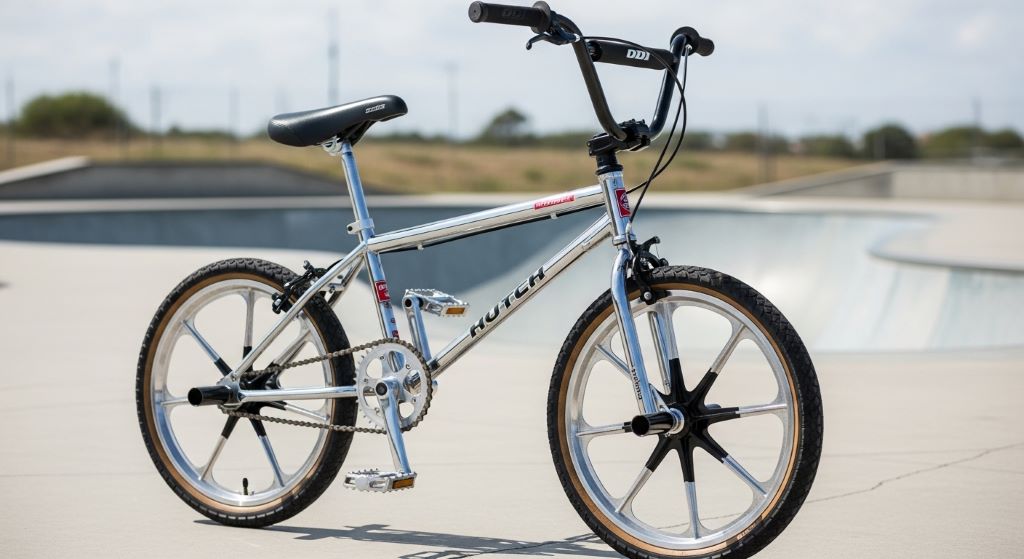
Hutch BMX bikes have a special place in cycling history. They were icons of the 1980s freestyle and racing scenes. Today, many riders still love them. Some want to restore them to their original glory. Others want to ride them hard in modern conditions. If you fall into the second group, this guide is for you.
Upgrading a vintage Hutch BMX can feel tricky. The geometry is old. The parts are rare. However, with the right approach, you can make your Hutch perform like a modern machine — without ruining what makes it special.
Understanding Your Hutch BMX Before You Start
Before you buy a single part, you need to know what you have. Hutch made several models over the years. The Trick Star, the Pro Racer, and the Persuader are among the most well-known. Each frame has slightly different tubing, geometry, and part compatibility.
First, check the frame condition carefully. Look for cracks around the head tube, bottom bracket shell, and dropout areas. These are the stress points on any BMX frame. A cracked frame is not safe to ride, regardless of how good the upgrades are. Therefore, start with a thorough inspection before spending money on components.
Also, measure your frame’s key dimensions. Note the head tube angle, the rear dropout spacing, and the bottom bracket shell width. These numbers will guide every upgrade decision you make.
Upgrading the Cockpit: Bars, Stem, and Grips
The cockpit is where rider and bike connect. Old Hutch bikes often came with narrow, low-rise bars. These were fine for 1980s riding styles. However, modern freestyle and street riding demands wider, taller bars for better control.
Look for bars that fit the original stem clamp diameter. Most vintage Hutch stems use a 22.2mm bar clamp. You can find modern bars in this size, but they are less common. Alternatively, you can upgrade to a modern stem with a 25.4mm or even 22.2mm clamp.
When replacing the stem, make sure it fits your fork’s steerer tube. Many Hutch forks have a 1-inch threaded steerer. You can use a quill stem in this size without any modification. If you switch to a threadless setup, you will need a new fork as well. That adds complexity, so think carefully before going that route.
Additionally, new grips make a surprising difference to comfort and safety. Old rubber grips dry out and crack over time. A fresh pair of soft compound grips gives you better control and cushions vibration.
Upgrading the Fork for Better Handling
The original Hutch fork was built for its era. It works fine for casual riding. However, if you plan to do jumps, street tricks, or regular skatepark sessions, a stronger fork is worth considering.
You have two main options here. First, you can keep the original fork and have it inspected by a welder. A professional can reinforce the crown and dropouts if needed. This keeps the vintage look intact.
Second, you can replace the fork with a modern chromoly option. Make sure the new fork matches your frame’s steerer tube size and has the correct offset for your geometry. A fork with too much or too little rake will change how the bike steers. This can make it feel unstable at speed. Therefore, match the offset as closely as possible to the stock measurement.
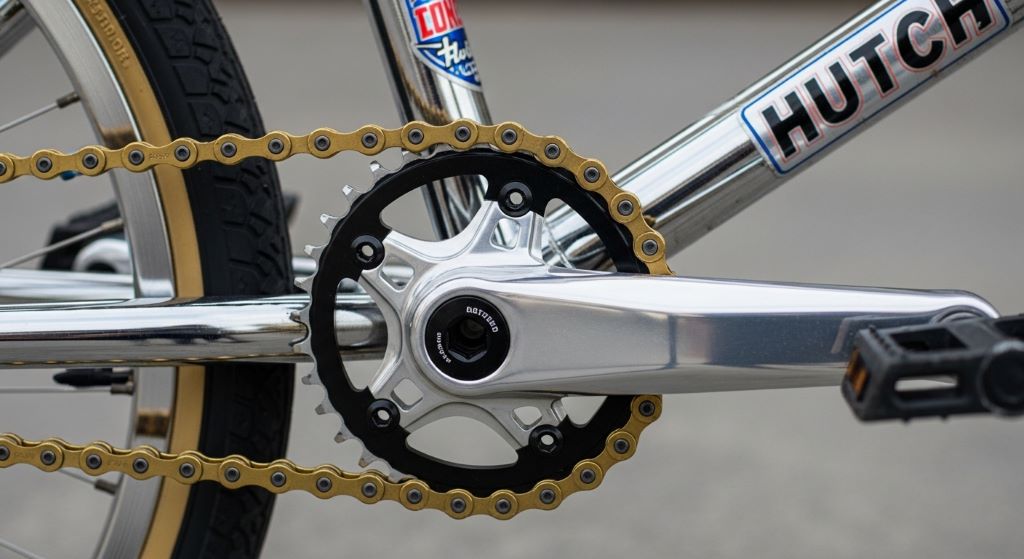
Upgrading the Drivetrain: Cranks, Chain, and Sprocket
The drivetrain on old Hutch bikes often used three-piece cranks with a cottered or square taper spindle. These can still work well if they are in good shape. However, modern riders often prefer sealed-bearing bottom brackets and splined cranks. These are stronger and need less maintenance.
When upgrading the cranks, check your bottom bracket shell width first. Most vintage BMX frames use a 68mm or 73mm shell. Many modern BMX bottom brackets are available in these sizes, so finding a match is usually straightforward.
For the sprocket, a 25-tooth front ring paired with a 9-tooth rear driver is the modern standard. However, you can run any gear ratio that suits your riding. Just make sure the sprocket is compatible with your chain size. Most modern BMX chains are half-inch pitch, which matches original Hutch gearing as well.
Replace the chain whenever you upgrade the sprocket. A worn chain on a new sprocket will skip and wear the teeth out quickly.
Upgrading the Wheels and Tires
This upgrade makes one of the biggest differences in how your Hutch rides. Original Hutch wheels were often built with heavy steel rims and basic hubs. Modern alloy rims are lighter and stronger. They also give you access to better hub options.
When building new wheels, pay attention to the rear dropout spacing on your frame. Most vintage Hutch frames have 110mm rear spacing. This matches many modern BMX hubs, so compatibility is usually good. However, always measure before ordering parts.
Choose a hub with the drive side you prefer. Freecoaster hubs are popular for flatland and park riding. Cassette hubs are better for street and trails. A freewheel hub is the simplest and most reliable for general use.
For tires, modern BMX tires offer far better grip and durability than vintage rubber. A 20×2.1 or 20×2.2 tire fits most Hutch frames without clearance issues. Additionally, modern tires use lighter casings, which reduce rotational weight and make the bike easier to spin.
Upgrading the Brakes Safely
Many modern riders run brakeless setups. However, if you are new to riding, or if you ride in public spaces, brakes are an important safety feature. Hutch bikes originally came with U-brakes or caliper brakes. Both can still be found in modern versions.
U-brakes mount directly to the frame and fork. They are simple and effective. If your frame has the correct brake mounts, a new set of U-brakes with fresh pads and a new cable will stop you well. Tektro and other brands still make quality U-brakes at affordable prices.
If your frame has caliper mounts instead, you can run a modern dual-pivot caliper. These offer strong, consistent stopping power with easy adjustment.
Replace the brake cable and housing at the same time as the brakes. Old cables fray and corrode. A frayed cable can snap without warning. Therefore, never skip this step when rebuilding a vintage bike for active riding.
Checking and Upgrading the Seat and Post
The seat is easy to overlook. However, a good seat keeps you comfortable and supports certain tricks. Original Hutch seats were often thin and hard by modern standards.
Many modern BMX seats are slim and durable. They fit standard 25.4mm seat posts. Check your frame’s seat tube diameter before ordering a new post. Some vintage frames have a 25.4mm seat tube, while others may vary slightly.
Use a seat post clamp that firmly holds the post in place. A post that slips mid-ride is both annoying and dangerous. Tighten the clamp to the recommended torque spec listed by the manufacturer.
Putting It All Together: Safety Checks Before Your First Ride
Once all upgrades are in place, do a full safety check before you ride. This step is critical and should never be rushed.
- Check that all bolts are tightened to spec. Use a torque wrench where possible.
- Spin each wheel and check for wobble. True the wheels if needed.
- Test the brakes at walking speed before riding fast.
- Check the chain tension. It should have around 5mm of play at the midpoint.
- Squeeze the bars and stem firmly. Nothing should move or creak.
- Inspect the headset. It should feel smooth and have no play.
Take a short, slow test ride in a safe area first. Listen for unusual sounds. Feel for anything that seems loose or off. If something does not feel right, stop and investigate before riding further.
Conclusion
Upgrading a Hutch BMX for modern riding is a rewarding project. You preserve a piece of BMX history while making the bike genuinely useful and safe for today’s riding. The key is to approach each upgrade methodically.
Start with a frame inspection, then work through the cockpit, fork, drivetrain, wheels, and brakes in a logical order. Always check part compatibility before buying. Use quality components from reputable brands. Most importantly, complete a thorough safety check before your first ride.
A well-upgraded Hutch BMX can handle modern street, park, or trail riding with confidence. Additionally, it will turn heads everywhere you go. There are few things cooler than a classic Hutch running smoothly in a modern skatepark.
Frequently Asked Questions
1. Can I use modern 48-spoke wheels on a vintage Hutch BMX frame? Yes, in most cases. However, check your rear dropout spacing first. Most Hutch frames use 110mm spacing, which is compatible with many modern hubs. Always verify before purchasing.
2. Is it safe to ride a vintage Hutch frame that has been repainted? It can be. However, a repaint can hide cracks or repairs. Have the frame inspected by a qualified welder or bike mechanic before riding. They can spot hidden damage that paint may cover.
3. What bottom bracket size does a Hutch BMX use? Most Hutch BMX frames use a 68mm or 73mm English threaded bottom bracket shell. Measure yours before ordering a replacement to ensure a correct fit.
4. Can I convert my threaded Hutch fork to a threadless setup? Technically yes, but it requires replacing the fork entirely with a threadless steerer version. This adds cost and complexity. For most riders, using a quality quill stem on the original threaded fork is a simpler and safer option.
5. How do I know if my Hutch frame is strong enough for modern riding? Have it inspected by a professional. Look for cracks, dents, and corrosion, especially around the welds. If the frame passes inspection and has no structural damage, it is generally safe for recreational riding with proper upgrades.
Related Topics:
BMX 20 Inch Freestyle: Mastering the Art of Two-Wheeled Flight
Sunday BMX Bikes: Choosing the Perfect Size for Your Ride

Welcome to outdoorxsports.com! I’m Russell, your guide to the awesome world of mountain biking. This blog is all about building a community of riders who love to share their passion for the sport. Expect inspiring stories, local trail recommendations, fun challenges, and tips for making the most of your time on two wheels.