
Cycling with music or podcasts can make your ride more enjoyable. Studies show that 65 percent of cyclists listen to audio while riding. Adding bike speakers bluetooth wireless to your handlebars is a simple way to boost your experience. These devices offer convenience and portability for riders of all levels. They also let you stay aware of your surroundings while enjoying your favorite tunes.
Why Choose Bluetooth Wireless Bike Speakers
Wireless speakers eliminate the hassle of tangled cords during your ride. They connect easily to your phone or music player via Bluetooth. This feature allows you to control playback without stopping your bike. Many models are also waterproof or water resistant for outdoor use.
Battery life is another key benefit of modern wireless speakers. Most models offer 8 to 20 hours of playtime on a single charge. This means you can enjoy long rides without worrying about running out of power. Some speakers even include a built in power bank to charge your phone.
Sound quality has improved significantly in recent wireless speakers. Many now deliver clear and loud audio even at high speeds. This makes them ideal for both city commutes and off road adventures. Their compact size also means they do not add much weight to your bike.
Types of Bike Speakers for Handlebars
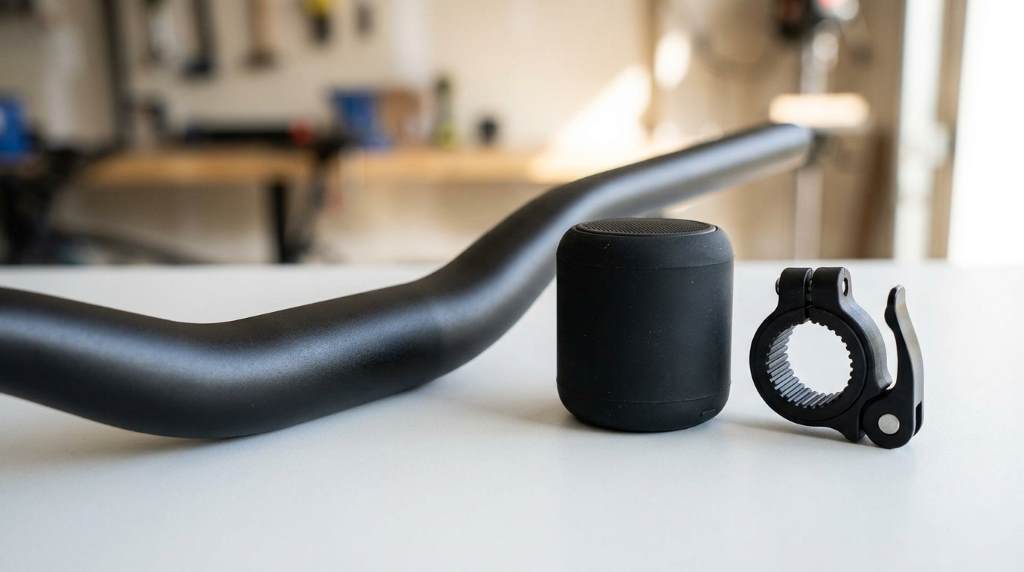
There are several types of bike speakers designed for handlebar mounting. Clip on speakers are popular for their ease of use. They attach directly to the handlebars with a simple clamp mechanism. These are lightweight and often the most affordable option for casual riders.
Mounted speakers come with a more permanent bracket system. These are ideal for riders who want a secure and stable setup. They often provide better sound quality due to their larger size. However they may require more effort to install and remove.
Some speakers are designed to fit inside the handlebar itself. These internal models offer a sleek and aerodynamic look. They are less visible and can reduce wind resistance. However they may be more complex to install and often cost more.
Tools and Materials You Will Need
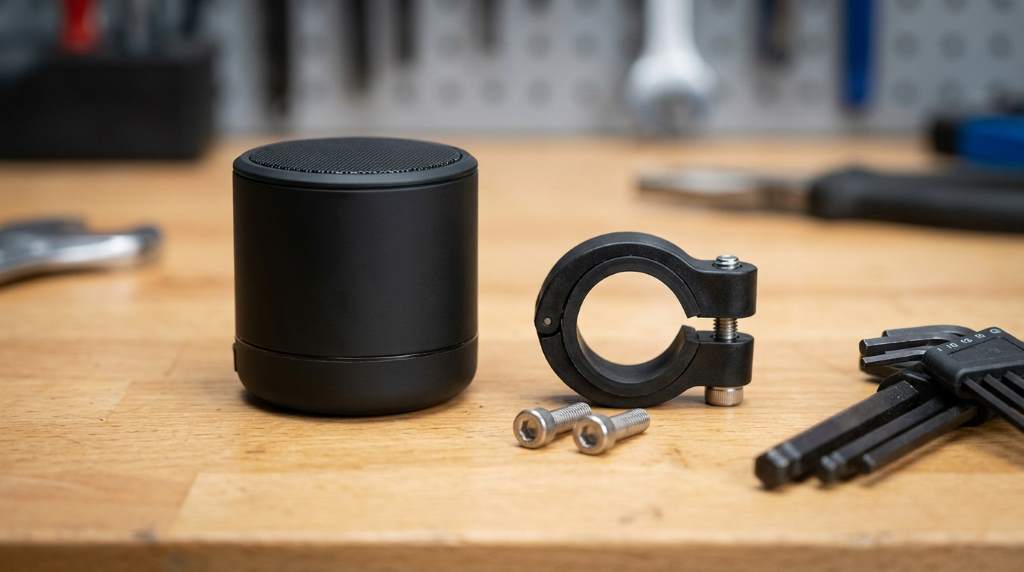
Gather the right tools before you start the installation process. A screwdriver set is essential for most handlebar mounts. You may need both flathead and Phillips head screwdrivers depending on your bike. Allen wrenches are also useful for bikes with hex bolts.
Rubber pads or anti slip grips can help secure the speaker in place. These prevent vibrations and reduce the risk of the speaker slipping. Zip ties are another handy item for extra security. They can be used to fasten wires or add support to the mount.
A measuring tape can help you position the speaker evenly on both sides. This ensures a balanced look and optimal sound distribution. If your speaker requires wiring you may also need wire cutters and electrical tape. Always check the manufacturer instructions for specific requirements.
Step by Step Guide to Mounting Bike Speakers
Step 1: Choose the Right Location
Start by selecting the best spot on your handlebars for the speaker. The center of the handlebars is often the most balanced location. This position distributes weight evenly and keeps the speaker stable. Avoid placing the speaker too close to the stem or grips.
Consider the angle of the speaker for the best sound projection. Pointing it slightly upward can help direct sound toward you. Test different positions before finalizing the placement. Make sure the speaker does not interfere with your grip or control of the bike.
Step 2: Attach the Mounting Bracket
Most wireless bike speakers come with a mounting bracket. Begin by attaching this bracket to the handlebars. Use the provided screws or clamps to secure it in place. Ensure the bracket is tight enough to prevent movement but not so tight that it damages the handlebars.
If your speaker uses a clamp system wrap it around the handlebar. Tighten the clamp evenly to avoid uneven pressure. For bracket systems align the bracket with your chosen location. Use a screwdriver to fasten the screws securely.
Step 3: Secure the Speaker to the Bracket
Once the bracket is in place attach the speaker to it. Most models have a quick release mechanism for easy removal. Slide the speaker into the bracket until it clicks into place. Ensure it is locked securely to prevent it from falling off during your ride.
Check the stability of the speaker by gently shaking the handlebars. If the speaker moves or wobbles tighten the bracket further. Some speakers come with additional rubber pads for extra grip. Place these between the speaker and the bracket for added security.
Step 4: Route the Wires (If Applicable)
If your speaker has wires for charging or auxiliary input route them neatly. Use zip ties to secure the wires along the handlebars or frame. This prevents them from dangling and getting caught in the wheels. Make sure the wires do not interfere with your riding.
For a cleaner look consider using cable sleeves or spiral wrap. These can bundle the wires together and make them less noticeable. If your speaker is fully wireless skip this step. However ensure the charging port is accessible for future use.
Step 5: Test the Speaker
Before heading out turn on the speaker and pair it with your device. Play some music to test the sound quality and volume. Make sure the speaker is functioning properly and the sound is clear. Adjust the angle if needed for better audio projection.
Check for any vibrations or rattling noises while the music plays. If you notice any issues tighten the mount or add rubber pads. Test the speaker at different speeds to ensure it stays secure. This step is crucial for both safety and enjoyment.
Tips for Different Handlebar Types
Flat Handlebars
Flat handlebars are common on mountain bikes and hybrid bikes. They provide a straightforward surface for mounting speakers. Use a clamp or bracket designed for flat bars. Ensure the speaker is centered for balanced weight distribution.
For flat handlebars consider placing the speaker near the stem. This keeps the weight close to the bike frame for better stability. Avoid mounting the speaker too far out as it can affect your grip. Always check the manufacturer guidelines for weight limits.
Drop Handlebars
Drop handlebars are typical on road bikes and offer a more aerodynamic position. Mounting speakers on these can be trickier due to the curved shape. Look for mounts specifically designed for drop bars. These often attach to the flat section near the stem.
If using a universal mount ensure it can adapt to the angle of the drop bars. You may need to use additional padding to secure the speaker properly. Avoid placing the speaker on the curved parts as it may not stay in place. Test the stability before riding at high speeds.
Riser Handlebars
Riser handlebars are higher and often wider than flat bars. They are common on comfort and cruiser bikes. The elevated position can be ideal for speaker placement. Use a mount that can handle the increased height and angle.
For riser bars consider mounting the speaker on the horizontal section. This provides a stable base and keeps the speaker within easy reach. Ensure the mount is tight enough to handle the vibrations from uneven terrain. Check the speaker angle to direct sound toward you.
Unique Considerations for Different Climates
Hot and Humid Climates
In hot and humid climates your speaker may be exposed to sweat and moisture. Choose a model with a high IPX rating for water resistance. Wipe down the speaker after each ride to prevent buildup of sweat or grime. This will extend the life of your device.
Direct sunlight can also affect the performance of your speaker. Prolonged exposure to UV rays may cause the plastic to fade or crack. Consider using a speaker cover or parking your bike in the shade when not in use. Regularly check the speaker for any signs of wear or damage.
Cold and Wet Climates
Cold temperatures can reduce battery life in wireless speakers. Keep your speaker charged and store it indoors when not in use. If riding in the rain ensure your speaker has a waterproof rating. Avoid submerging the speaker in water even if it is waterproof.
Ice and snow can also pose challenges for handlebar mounted speakers. Ensure the mount is secure and free from ice buildup. After riding in wet conditions dry the speaker thoroughly. This prevents water from seeping into the internal components.
Dusty and Windy Climates
Dust can clog the speaker grills and affect sound quality. Regularly clean the speaker with a soft brush or cloth. Avoid using compressed air as it can push dust further into the device. Check the manufacturer guidelines for cleaning recommendations.
Windy conditions can make it harder to hear your speaker. Position the speaker closer to your ears for better audio clarity. Some models come with wind shields or noise canceling features. Consider investing in these if you frequently ride in windy areas.
Maintenance and Care for Your Bike Speakers
Regular maintenance ensures your bike speakers last longer. Clean the speaker and mount after every few rides. Use a damp cloth for the exterior and a dry brush for the grills. Avoid harsh chemicals that can damage the surface.
Check the mount and screws periodically for tightness. Vibrations from riding can loosen them over time. Tighten any loose parts to prevent the speaker from falling off. Lubricate the mount if it starts to squeak or resist movement.
Store your speaker in a dry and cool place when not in use. Extreme temperatures can damage the battery and internal components. If storing for a long period charge the speaker to about 50 percent. This helps maintain battery health during storage.
Safety Tips for Using Bike Speakers
Safety should always be a priority when using bike speakers. Keep the volume at a level where you can still hear traffic and surroundings. This is crucial for avoiding accidents and staying aware of your environment. Never wear headphones while riding as they block out external sounds.
Ensure the speaker mount does not interfere with your bike controls. Test the brakes and gears after installation to confirm everything works properly. Avoid mounting the speaker where it can obstruct your view or access to the handlebars.
Be mindful of local laws regarding the use of audio devices while cycling. Some areas may have restrictions on volume levels or the use of speakers. Always ride responsibly and consider the safety of others around you.
Troubleshooting Common Issues
Speaker Not Connecting via Bluetooth
If your speaker is not connecting check that Bluetooth is enabled on your device. Ensure the speaker is in pairing mode and within range. Most speakers have a pairing button or indicator light. Refer to the user manual for specific instructions.
Restart both the speaker and your device if the connection fails. Forget the speaker in your device Bluetooth settings and pair it again. Interference from other devices can also cause issues. Move away from crowded Wi Fi or Bluetooth areas.
Poor Sound Quality
Poor sound quality can result from a weak Bluetooth connection. Move your device closer to the speaker to improve the signal. Obstacles like bags or clothing can also interfere. Ensure there is a clear line of sight between the speaker and your device.
Check the speaker for any physical damage or blockages. Clean the grills and ensure nothing is covering the speaker. If the issue persists try resetting the speaker to factory settings. This can often resolve software related sound problems.
Speaker Falls Off During Ride
If the speaker falls off inspect the mount for any damage or wear. Ensure all screws and clamps are tightened properly. Add rubber pads or anti slip grips for extra security. These can provide a better grip on the handlebars.
Consider using zip ties for additional support. Wrap them around the mount and handlebars to prevent movement. Avoid overtightening as it can damage the handlebars or speaker. Test the stability before resuming your ride.
Unique and Uncommon Tips for Bike Speaker Mounting
For a more customized look consider painting the mount to match your bike. Use spray paint designed for plastic or metal surfaces. This can give your bike a cohesive and stylish appearance. Always allow the paint to dry completely before mounting the speaker.
If you ride at night add reflective tape to the speaker or mount. This increases your visibility to other road users. Reflective stickers are an affordable and effective safety measure. They can be easily applied and removed without damaging the speaker.
For a temporary setup use a handlebar bag with a built in speaker pocket. This allows you to remove the speaker easily when not in use. It also provides additional protection from the elements. Choose a bag with a clear window for touch controls.
To reduce wind noise position the speaker behind the handlebars. This creates a wind shadow that can improve sound clarity. Experiment with different angles to find the best position. Some riders also use foam covers to minimize wind interference.
Conclusion
Mounting bike speakers bluetooth wireless models on your handlebars is a great way to enhance your riding experience. Follow the steps and tips outlined in this guide for a secure and enjoyable setup. Always prioritize safety and regular maintenance to extend the life of your speaker.
Experiment with different positions and mounts to find what works best for you. Whether you are commuting or exploring off road trails the right speaker can make your ride more enjoyable. Start your next adventure with your favorite tunes or podcasts playing along.
Ready to upgrade your cycling experience? Pick a high quality wireless speaker and follow this guide to mount it on your handlebars today.
FAQ
Can I mount any wireless speaker on my bike handlebars?
Not all wireless speakers are designed for bike mounting so choose a model with a secure handlebar mount.
How do I know if my speaker is waterproof?
Check the IPX rating on the speaker specifications with IPX4 or higher being water resistant.
Will mounting a speaker affect my bike warranty?
Most bike warranties are not affected by adding accessories but check your manufacturer guidelines to be sure.
Can I use multiple speakers on my bike?
Yes you can use multiple speakers for stereo sound but ensure they are properly synced and mounted securely.
How often should I clean my bike speaker?
Clean your speaker after every few rides or more often if you ride in dusty or wet conditions.

Welcome to outdoorxsports.com! I’m Russell, your guide to the awesome world of mountain biking. This blog is all about building a community of riders who love to share their passion for the sport. Expect inspiring stories, local trail recommendations, fun challenges, and tips for making the most of your time on two wheels.