
Wearing a well-fitted mountain bike helmet can reduce the risk of head injuries by up to 85 percent. Yet many riders still wear helmets that do not fit correctly. A proper fit ensures both safety and comfort during rides. This guide will show you how to measure your head accurately for the best protection.
Studies show that over 60 percent of cyclists do not adjust their helmets properly. This can lead to discomfort or even failure in critical moments. Measuring your head is the first step to a secure and enjoyable ride. Let us walk you through the process.
Why a Proper Helmet Fit Matters
A helmet that fits well stays in place during impacts. It also distributes force evenly to reduce injury severity. Poorly fitted helmets can shift or fall off when you need them most. Safety should always come first for every rider.
Comfort is another key reason to get the right fit. A snug helmet prevents distractions and headaches on long rides. It also encourages consistent use since it feels natural. Riding with a loose helmet can cause irritation and fatigue.
Proper fit also improves aerodynamics and visibility. A stable helmet reduces wind resistance and noise. This allows you to focus on the trail ahead. It also ensures vents align correctly for better airflow.
Tools You Will Need
Gather a soft measuring tape for accuracy. If you do not have one, use a string and a ruler. A mirror can help you check the helmet position later. These tools make the process simple and precise.
A friend or family member can assist with measurements. They can ensure the tape stays level around your head. This helps avoid errors in sizing. Accuracy is critical for the best fit.
Step-by-Step Guide to Measuring Your Head
Step 1: Prepare Your Hair
Wear your hair in its usual riding style. If you have long hair, pull it back into a ponytail. This ensures the measurement matches your riding conditions. Consistency is key for accuracy.
Avoid wearing hats or headbands during measurement. These can add extra bulk and skew results. Keep your head bare for the most precise reading. This step only takes a minute.
Step 2: Locate the Measurement Point
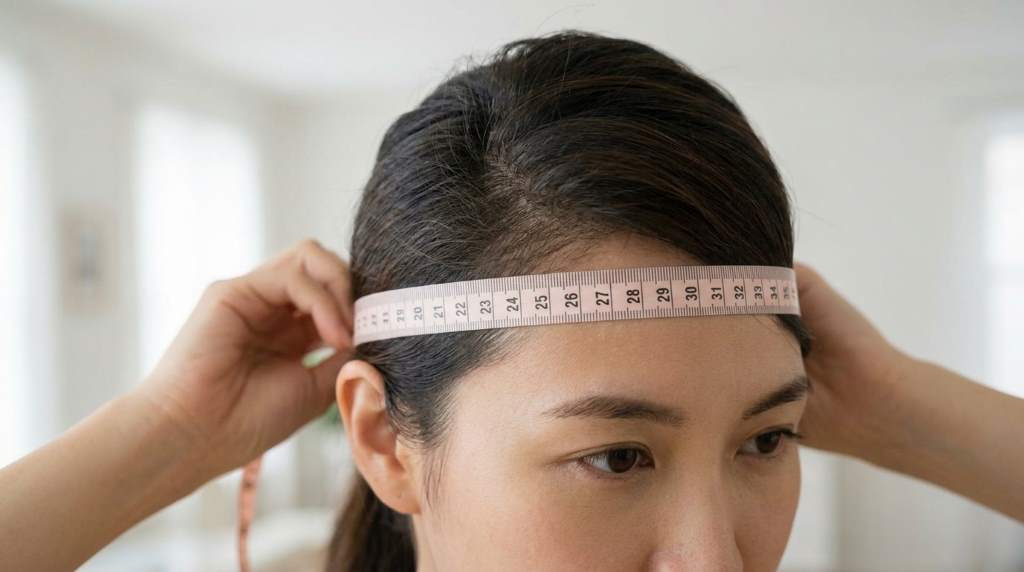
Place the tape about one inch above your eyebrows. This is the widest part of your head. It is also where most helmets sit for optimal protection. Mark this spot lightly with a pencil if needed.
The tape should wrap around the back of your head. It must cover the occipital bone at the base of your skull. This area is crucial for helmet stability. Double-check the position before recording the number.
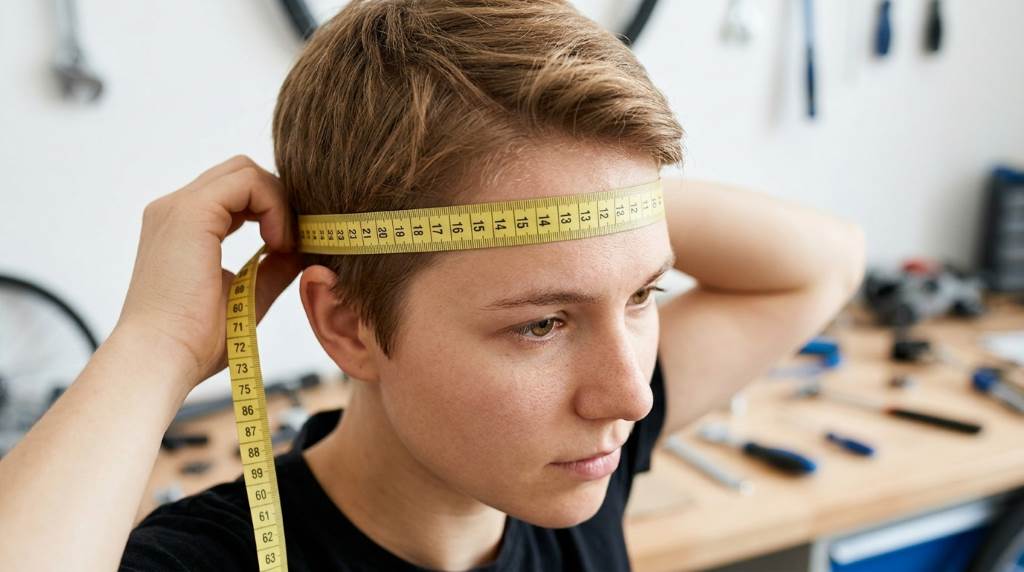
Step 3: Take the Measurement
Hold the tape snug but not too tight. It should rest flat against your skin all around. Breathe normally and avoid pulling the tape. This ensures a natural and accurate measurement.
Read the number where the tape meets its starting point. Record this in both inches and centimeters. Most helmet sizes use centimeters, but inches are useful for reference. Write it down immediately to avoid forgetting.
Step 4: Repeat for Accuracy
Measure your head two or three times to confirm consistency. Small variations can occur due to tape placement. The closest measurements are usually the most reliable. Use the average if results differ slightly.
If using a string, mark the point where it overlaps. Then lay it flat against a ruler to get the length. This method works just as well as a tape measure. Ensure the string lies straight for precision.
Understanding Helmet Sizes
Helmet sizes typically range from small to extra large. Each brand may have slight variations in sizing charts. Always refer to the manufacturer guidelines for your specific model. This prevents guesswork and ensures a better fit.
Small helmets usually fit heads measuring 51 to 55 centimeters. Medium sizes cover 55 to 59 centimeters. Large helmets fit 59 to 63 centimeters. Extra large options start at 63 centimeters and above. Check your measurement against these ranges.
Some brands offer intermediate sizes for a more customized fit. Youth helmets often have smaller ranges for growing children. Always measure again if you are between sizes. A proper fit is worth the extra effort.
Trying On Your Helmet
Place the helmet on your head and adjust the straps. The front edge should sit just above your eyebrows. This position protects your forehead in a fall. The helmet must not tilt backward or forward.
Fasten the chin strap snugly under your chin. You should be able to fit one or two fingers between the strap and your skin. This ensures the helmet stays secure without causing discomfort. Test the fit by shaking your head gently.
The helmet should not move more than an inch in any direction. If it shifts easily, try a smaller size or adjust the fit system. Many helmets have dials or pads for fine-tuning. Use these features to achieve a perfect fit.
Unique Considerations for Mountain Biking
Mountain biking often involves rough terrain and sudden stops. A secure helmet is essential for these conditions. Consider full-face helmets for downhill riding. They offer extra protection for your chin and jaw.
Ventilation is another factor for mountain biking. Helmets with adjustable vents help regulate temperature. This is especially important in hot climates or during long rides. Comfort keeps you focused on the trail.
Some riders prefer helmets with built-in camera mounts. These allow you to record your rides without compromising fit. Check the weight of the helmet as well. Lighter models reduce neck strain on technical trails.
For riders with non-standard head shapes, look for brands with adjustable fit systems. These helmets can accommodate oval or round head shapes. Trying on multiple models can help you find the best match. Do not settle for a helmet that feels uncomfortable.
Common Mistakes to Avoid
One common mistake is choosing a helmet based on looks alone. Style is important, but fit and safety come first. Always prioritize function over fashion. A poorly fitted helmet offers little protection.
Another error is ignoring the manufacturer sizing chart. Sizes can vary between brands, so always check the specifics. Assuming your size based on past purchases can lead to a poor fit. Take the time to measure each time.
Some riders wear their helmets too loose or too tight. A loose helmet can fall off during a crash. A tight helmet can cause headaches and discomfort. The right fit balances security and comfort.
Forgetting to adjust the straps is another oversight. Straps that are too loose reduce helmet effectiveness. Straps that are too tight can dig into your skin. Always fine-tune the fit before riding.
Climate-Specific Tips
In hot and humid climates, choose helmets with plenty of vents. These improve airflow and keep you cool. Light-colored helmets reflect sunlight and reduce heat absorption. Hydration is also key for comfort.
For cold weather riding, consider a helmet with fewer vents. Some models allow you to close vents for warmth. A thin beanie under the helmet can add insulation. Ensure the beanie does not interfere with the fit.
In rainy conditions, look for helmets with water-resistant features. Some have removable liners for quick drying. A visor can also help keep rain out of your eyes. Always check the helmet materials for durability in wet weather.
Windy areas may require a more aerodynamic helmet design. These reduce drag and improve stability. A secure fit is even more critical in gusty conditions. Test the helmet in different weather scenarios if possible.
Maintaining Your Helmet
Clean your helmet regularly with mild soap and water. Avoid harsh chemicals that can damage the materials. A clean helmet lasts longer and performs better. Inspect it for cracks or wear after each ride.
Store your helmet in a cool, dry place away from direct sunlight. Extreme temperatures can weaken the structure. Never leave it in a car on hot days. Proper storage extends its lifespan.
Replace your helmet after any significant impact. Even if it looks fine, the internal structure may be compromised. Most manufacturers recommend replacing helmets every three to five years. This ensures continued protection.
Conclusion
Measuring your head for a mountain bike helmet is a simple but vital process. It ensures your helmet provides the best protection and comfort. Follow the steps outlined here to get an accurate measurement every time.
Remember that a proper fit can make all the difference in safety. Do not rush the process or skip steps. Your helmet is your most important piece of gear on the trail. Take the time to get it right.
Now that you know how to measure your head, try on a few helmets to find your perfect match. Ride with confidence knowing you are well-protected. Share this guide with fellow riders to spread awareness about helmet safety.
FAQ
How often should I replace my mountain bike helmet?
Replace your helmet after any impact or every three to five years, whichever comes first.
Can I use a road bike helmet for mountain biking?
Yes, but mountain bike helmets often offer better coverage and ventilation for off-road use.
What if my head measurement is between sizes?
Try both sizes and use the helmet’s adjustable fit system to achieve a secure fit.
Do all helmets have the same shape?
No, helmet shapes vary by brand and model to accommodate different head shapes.
Is it safe to buy a helmet online without trying it on?
It can be safe if you know your exact head measurement and the brand’s sizing chart.

Welcome to outdoorxsports.com! I’m Russell, your guide to the awesome world of mountain biking. This blog is all about building a community of riders who love to share their passion for the sport. Expect inspiring stories, local trail recommendations, fun challenges, and tips for making the most of your time on two wheels.