
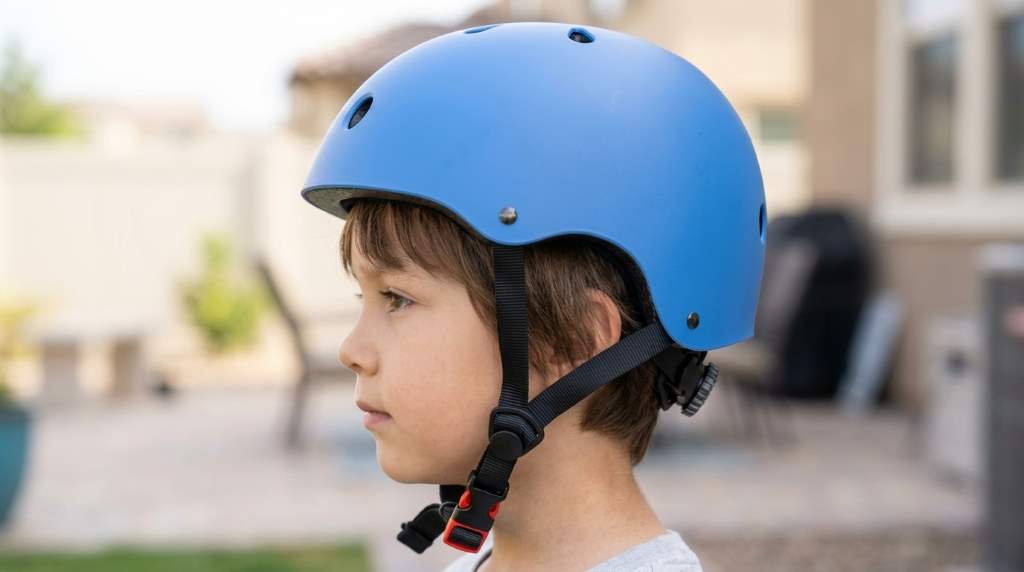
To adjust an Ouwoer kids bike helmet, first position it level, tighten the rear dial, and align the side straps. Then secure the chin strap and perform a movement check. A properly fitted helmet should stay stable without creating pressure points or blocking your child’s vision.
Helmet fit matters because cycling crashes can cause serious head injuries. In 2024, an estimated 428,300 bicycle-related emergency department visits occurred. Proper helmet use has also been associated with a 48% reduction in head injuries among cyclists.
If you use an Ouwoer kids bike helmet, adjustment becomes easier when you understand each component. This guide covers sizing, padding, straps, chin tension, fit checks, common problems, and important safety checks.
Start With the Correct Helmet Size
Adjustment cannot compensate for a helmet that does not match your child’s head circumference. Therefore, measure your child’s head before changing any strap or retention setting.
Wrap a flexible measuring tape around the head, roughly one inch above the eyebrows. Keep the tape level across the forehead and around the widest rear section.
Many OUWOER three-size listings specify Small at 48 to 54 centimeters. Medium commonly covers 54 to 57 centimeters, while Large covers 57 to 61 centimeters.
However, always check the size information supplied with your specific helmet. Different OUWOER models can have different sizing ranges and adjustment systems.
Do Not Size Up for Growth
Parents sometimes choose a larger helmet because children grow quickly. That approach can leave excessive movement around the head.
Instead, choose a size that matches the child’s current head measurement. The rear dial and padding should fine-tune the fit rather than compensate for an oversized shell.
Prepare the Ouwoer Helmet Before Adjustment
Place the helmet on a clean, stable surface before inspecting its adjustment components. Look inside for the retention system, padding, straps, buckle, and manufacturing label.
OUWOER models commonly use a rear crank adjustment dial, interchangeable pads, and adjustable chin straps. Some versions also provide different pad thicknesses for finer fitting.
Check that every strap lies flat and does not twist around the buckle or adjustment hardware. Also inspect the shell and EPS foam for cracks, crushing, or other visible damage.
Check the Padding First
If your model includes interchangeable pads, select the thickness that provides a snug, comfortable fit. Thicker pads can reduce excess space when the helmet feels slightly loose.
Do not stack extra household materials inside the helmet. Unapproved padding can change the helmet’s position and interfere with its intended protection.
Step-by-Step Ouwoer Helmet Adjustment
1. Place the Helmet Correctly
Have your child sit naturally while you place the helmet squarely on the head. Keep the front edge low enough to protect the forehead without obstructing vision.
The helmet should sit level rather than pointing upward at the front or dropping heavily toward the eyebrows. A level position also makes the remaining adjustments more accurate.
Ask your child to look forward and then move the head naturally. If the shell immediately shifts, begin by checking the size and rear retention setting.
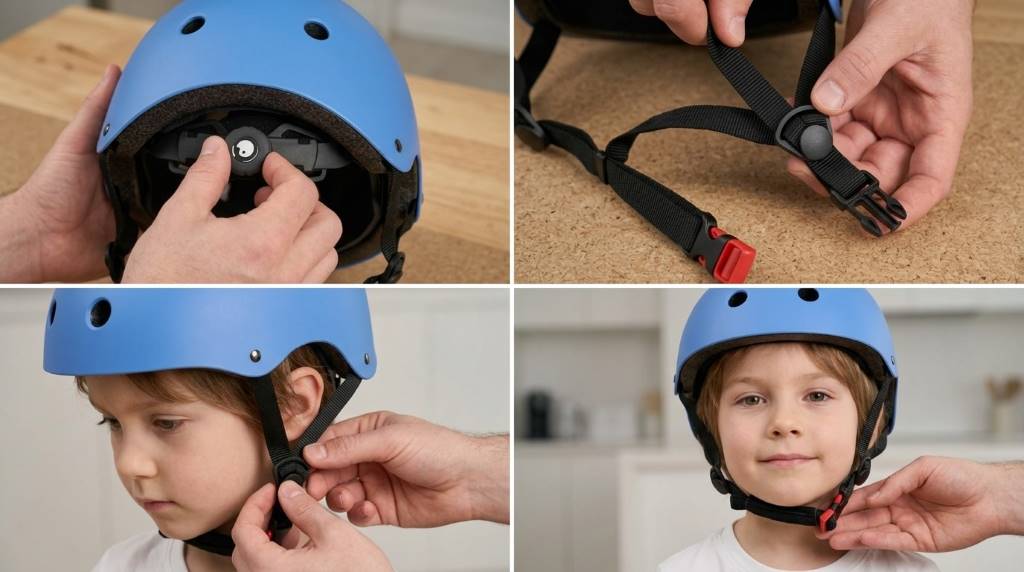
2. Loosen the Rear Dial Before Fitting
Turn the rear crank dial counterclockwise until the retention system becomes loose enough for easy placement. Avoid starting with the dial fully tightened.
Position the helmet first, then slowly turn the dial clockwise. Stop when the helmet feels secure around the head without creating painful pressure.
The dial should create even tension rather than squeezing one area. If tightening causes discomfort before the helmet becomes stable, reassess the size and padding.
3. Adjust the Side Straps Around the Ears
Find the strap adjusters on both sides of the helmet. Move each adjuster until the front and rear straps create a clean V around the ear.
The V junction should sit just below the earlobe. Keep both sides reasonably symmetrical so the helmet remains centered.
Do not leave one side significantly looser than the other. Uneven tension can allow the helmet to twist or shift during movement.
4. Position the Chin Strap
Buckle the chin strap beneath your child’s chin and adjust its length gradually. The strap should feel snug without pressing painfully against the skin.
A practical fit check allows about one finger between the strap and the chin. Your child should still breathe, speak, and open the mouth comfortably.
Keep the buckle centered beneath the chin instead of pushing it toward one side. Also make sure the strap does not sit directly across the throat.
5. Perform the Shake Test
Leave the chin strap unbuckled for the first retention check. Ask your child to gently shake the head from side to side.
The helmet should remain relatively stable instead of sliding across the forehead. If it moves substantially, tighten the rear dial slightly and repeat the test.
Next, ask your child to bend forward carefully. The helmet should remain secure rather than falling away from the head.
6. Complete the Final Buckle Check
Once the retention system and side straps look correct, buckle the chin strap. Check that the buckle closes completely and the strap remains comfortable.
Ask your child to look up, look down, turn sideways, and open the mouth. The helmet should remain stable during each movement.
Finally, gently move the helmet forward, backward, and sideways with your hands. Minor movement can occur, but the helmet should not rock excessively.
What a Properly Adjusted Helmet Should Look Like
| Adjustment area | Correct result | Warning sign |
|---|---|---|
| Helmet position | Level and stable | Tilts backward or forward |
| Rear dial | Snug without pressure | Helmet remains loose |
| Side straps | V shape below each ear | Straps sit near the eyes |
| Chin strap | Snug with about one finger | Loose or painfully tight |
| Movement test | Minimal shifting | Helmet slides or rocks |
This simple comparison helps identify problems before your child starts riding. More importantly, it prevents you from treating every fit problem as a strap problem.
Fix Common Ouwoer Helmet Fit Problems
The Helmet Keeps Sliding Back
A helmet that slides backward usually needs better positioning or retention adjustment. First, lower the front slightly and ensure the rear dial holds the helmet firmly.
Next, inspect the side straps and move their adjusters toward the correct V position. If the helmet still slides backward, check whether the shell actually matches your child’s head size.
The Helmet Feels Too Tight
Immediately loosen the rear dial if your child reports painful pressure. Then check whether the padding thickness creates unnecessary compression.
Try the thinner supplied pads if your model includes multiple pad sets. If the helmet remains uncomfortable, the problem may involve size or head shape rather than adjustment.
The Helmet Rocks Side to Side
Side-to-side movement often indicates loose retention or incorrectly positioned side straps. Tighten the rear dial slightly and reposition both strap adjusters.
Then repeat the shake test before buckling the chin strap. If significant movement continues, do not rely on a tighter chin strap to solve the problem.
The Straps Keep Twisting
Twisted straps can prevent consistent tension and create uncomfortable pressure points. Remove each twist before adjusting the strap length.
Also check the buckle and strap junction for trapped webbing. Flat straps should contact the skin comfortably without folding into narrow edges.
When Padding Makes a Difference
Padding can fine-tune the internal fit when the helmet sits slightly loose. OUWOER models with interchangeable pads may include different thickness options for this purpose.
Choose padding that creates even contact around the head. Avoid creating isolated pressure points near the temples, forehead, or back of the skull.
Padding should support the helmet’s fit rather than force an incorrect size to work. If the shell remains unstable after adjustment, select a more appropriate size.
Hair, Ponytails, and Glasses Can Affect Fit
Long hair can change how the retention system contacts the head. Keep bulky ponytails or hair accessories from forcing the helmet upward or backward.
Likewise, glasses should sit naturally without pushing the helmet away from the forehead. Adjust the helmet position before tightening the straps around eyewear.
Do not add hats underneath the helmet unless the manufacturer specifically allows that arrangement. Extra material can alter the fit and reduce stability.
Important OUWOER Recall Check Before Riding
There is an important safety point that parents should not overlook. The CPSC recalled certain OUWOER kids bike helmets in 2023 because they failed federal positional stability and impact attenuation requirements.
The recalled helmets involved a Medium model with a 202201 production date. Those helmets had a listed head circumference range of approximately 21.25 to 22.5 inches.
If your helmet carries that production date and matches the recalled model, stop using it immediately. Do not attempt to make a recalled helmet safe through better strap adjustment.
Check the inside label and compare the model details with current official recall information before riding. A proper fit cannot correct a helmet that fails applicable safety requirements.
How Often Should You Recheck the Fit?
Check the helmet before every ride, especially when children frequently handle their own gear. Strap adjusters can move during storage, transport, or repeated use.
Also perform a complete fit review whenever your child grows noticeably. Recheck the size before each riding season because head circumference can change quickly.
- Check helmet position before every ride.
- Confirm the rear dial remains comfortably snug.
- Make sure both side straps form matching V shapes.
- Check chin strap tension and buckle security.
- Repeat the movement test after major adjustments.
- Inspect the shell and foam for visible damage.
When You Should Replace the Helmet
Replace the helmet after a significant crash, even when the outside looks normal. Impact can damage protective materials without producing obvious external marks.
Also replace a helmet when the shell, EPS foam, straps, buckle, or retention system becomes damaged. Do not continue riding simply because the helmet still looks attractive.
Age and wear also matter because materials can deteriorate over time. Follow the manufacturer’s replacement guidance and inspect the helmet regularly.
A Fast Pre-Ride Fit Routine
Once the helmet fits correctly, you can reduce the daily check to a few simple actions. Position, retention, straps, buckle, and movement provide the essential sequence.
- Place the helmet level on the head.
- Tighten the rear dial until comfortably snug.
- Set both side straps into V shapes below the ears.
- Buckle the chin strap and check its tension.
- Perform a quick movement check.
This routine takes only moments but helps catch adjustment changes before they become riding problems. Make it part of your child’s normal pre-ride routine.
Frequently Asked Questions
How tight should an Ouwoer kids bike helmet be?
The helmet should feel snug and stable without causing pain, pressure points, or restricted movement.
Where should the Ouwoer helmet straps sit?
The side straps should form a V shape that meets just below each ear.
How do I tighten an Ouwoer kids helmet?
Turn the rear crank dial gradually until the helmet fits securely without excessive pressure.
How much space should the chin strap have?
Allow roughly one finger between the secured chin strap and your child’s chin.
What if the Ouwoer helmet still moves after adjustment?
Recheck the size and padding because excessive movement can indicate an unsuitable helmet size or shape.
Final Fit Check Before the Ride
Adjusting an Ouwoer kids bike helmet correctly requires more than tightening the rear dial. The best fit combines the correct size, level positioning, stable retention, properly aligned straps, and comfortable chin tension.
Before every ride, perform the quick five-point check and watch for changes as your child grows. Also verify the helmet’s model and production details against applicable safety recalls before putting it back into service.
Take a few minutes to adjust your child’s helmet today, then perform the movement test together. A secure, comfortable fit gives your young rider a better foundation for safer cycling.
Welcome to outdoorxsports.com! I’m Russell, your guide to the awesome world of mountain biking. This blog is all about building a community of riders who love to share their passion for the sport. Expect inspiring stories, local trail recommendations, fun challenges, and tips for making the most of your time on two wheels.