
BMX riders in the USA replace pedals more often than many other bike components due to frequent impacts and aggressive riding styles. According to cycling industry surveys, nearly 40% of BMX enthusiasts upgrade or replace their pedals within the first year of ownership. Learning how to change your BMX bike pedals correctly saves money, improves performance, and prevents damage to your bike’s crank arms. Choosing quality bmx bike pedals also enhances grip, comfort, and riding confidence on every session.
Whether your current pedals are worn out, damaged, or simply outdated, replacing them is a straightforward maintenance task. With the proper tools and techniques, you can complete the job safely in less than thirty minutes.
Why You Should Change Your BMX Bike Pedals
BMX pedals endure tremendous stress during tricks, jumps, and street riding. Therefore, they naturally wear down faster than components on standard bicycles.
Replacing damaged pedals improves safety, boosts performance, and protects your crank arms from excessive wear. Additionally, newer pedal designs often provide superior traction and durability.
- Improve foot grip and control
- Prevent pedal slippage during tricks
- Reduce rider fatigue
- Protect crank arm threads
- Upgrade bike appearance
Signs That Your BMX Bike Pedals Need Replacement
Before learning how to change your BMX bike pedals, inspect your current pedals carefully. Several warning signs indicate that replacement is necessary.
Excessive Bearing Play
If your pedals wobble from side to side, the internal bearings may be worn. Consequently, riding performance and safety can decrease significantly.
Cracked or Damaged Bodies
Plastic and alloy pedals can crack after repeated impacts. Once structural damage appears, replacement becomes essential.
Poor Grip Performance
Missing pins or worn surfaces reduce traction. As a result, your feet may slip during landings or technical maneuvers.
Grinding or Rough Rotation
Smooth pedal rotation indicates healthy bearings. However, grinding sensations usually signal internal wear.
Tools Required to Change BMX Bike Pedals
Gathering the proper tools beforehand makes the process much easier. Fortunately, most BMX pedal replacements require only basic equipment.
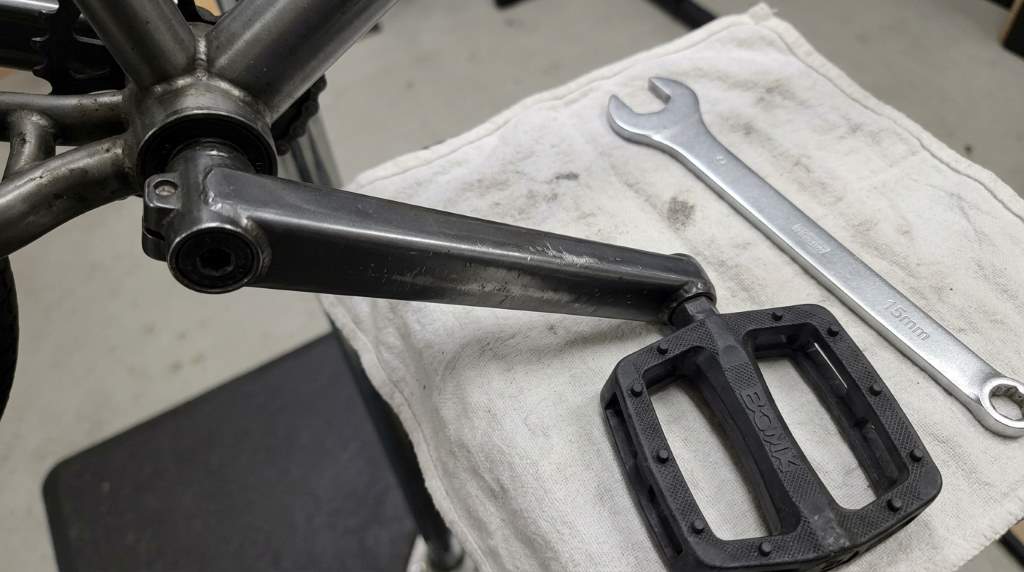
- 15mm pedal wrench or spanner
- Allen key set if required
- Bike grease
- Clean cloth
- Protective gloves
Some modern BMX pedals use hex fittings instead of traditional wrench flats. Therefore, check your pedal design before beginning.
Understanding Left and Right BMX Pedals
One of the most important aspects of changing BMX pedals involves understanding pedal threading. Unlike many bike components, pedals use opposite thread directions.
The right pedal tightens clockwise and loosens counterclockwise. Meanwhile, the left pedal tightens counterclockwise and loosens clockwise.
This reverse threading prevents pedals from loosening while riding. Consequently, installing pedals incorrectly can damage expensive crank arms.
How to Change Your BMX Bike Pedals Step by Step
Step 1: Position Your BMX Bike
Place your BMX bike on a repair stand or lean it securely against a wall. Stable positioning improves safety and access.
Rotate the crank arms until they sit horizontally. This position provides maximum leverage during pedal removal.
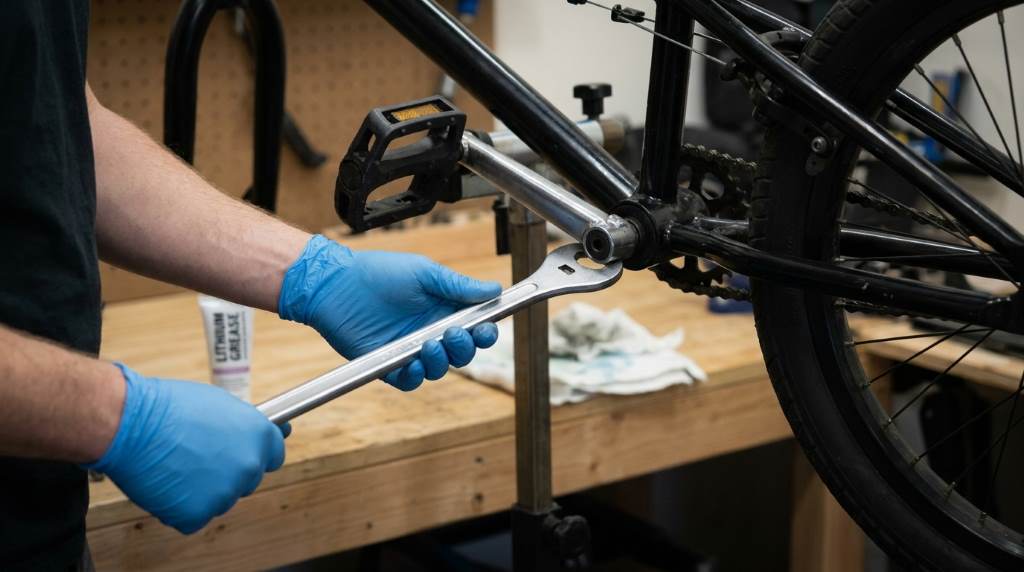
Step 2: Remove the Right Pedal
Locate the right pedal on the chain side of your BMX bike. Insert your pedal wrench securely onto the pedal flats.
Turn the wrench counterclockwise to loosen the pedal. Apply steady pressure until the threads begin turning freely.
Step 3: Remove the Left Pedal
Move to the non-drive side of the bike. Place your wrench onto the left pedal securely.
Turn the wrench clockwise to loosen the pedal. Continue rotating until the pedal completely separates from the crank arm.
Step 4: Inspect and Clean the Threads
Examine the crank arm threads carefully for damage or debris. Dirt buildup can interfere with proper installation.
Use a clean cloth to wipe away grease, metal particles, and contaminants. Clean threads help prevent cross-threading.
Step 5: Apply Grease to the New Pedals
Coat the pedal threads lightly with bicycle grease. Proper lubrication prevents thread seizure and corrosion.
Additionally, grease simplifies future pedal removal. This simple step can save significant maintenance time later.
Step 6: Install the New Right Pedal
Insert the right pedal into the drive-side crank arm. Begin threading by hand to avoid cross-threading.
Turn the pedal clockwise until fully seated. Then tighten securely using your pedal wrench.
Step 7: Install the New Left Pedal
Position the left pedal into the non-drive-side crank arm. Again, start threading manually.
Turn the pedal counterclockwise until fully tightened. Finish tightening using the appropriate tool.
Common Mistakes to Avoid When Changing BMX Bike Pedals
Many riders accidentally damage their components during pedal replacement. Fortunately, avoiding common errors is relatively simple.
- Installing pedals on the wrong sides
- Forcing cross-threaded pedals
- Skipping thread lubrication
- Using incorrect tools
- Overtightening pedal threads
Paying attention to thread direction prevents most installation problems. Therefore, always verify pedal markings before installation.
How to Choose New BMX Bike Pedals
Selecting replacement pedals involves more than appearance. Several performance factors influence riding quality.
Material Selection
Plastic pedals offer affordability and impact resistance. Conversely, aluminum pedals provide greater durability and premium performance.
Grip Design
Pedal pins determine foot traction levels. More aggressive pins generally provide stronger grip during technical riding.
Platform Size
Wider pedal platforms distribute pressure more evenly. Consequently, many BMX riders prefer larger pedal surfaces.
Bearing Quality
Sealed bearings require less maintenance and resist dirt intrusion. Therefore, they remain popular among serious BMX riders.
How Often Should You Replace BMX Bike Pedals?
Replacement frequency depends heavily on riding style and terrain conditions. Street riders typically replace pedals more often than park riders.
For most BMX enthusiasts in the USA, replacing pedals every one to three years provides optimal performance. However, frequent trick riders may require annual replacement.
Maintenance Tips to Extend BMX Pedal Life
Regular maintenance helps maximize pedal longevity and performance. Fortunately, pedal maintenance requires minimal effort.
- Clean pedals after muddy rides
- Inspect pins regularly
- Check bearing smoothness monthly
- Remove debris promptly
- Retighten pedals periodically
Preventive maintenance reduces replacement costs while maintaining riding safety. Therefore, routine inspections remain worthwhile.
Conclusion
Learning how to change your BMX bike pedals is an essential skill for every rider. Proper installation improves safety, performance, and overall riding enjoyment.
By following the correct removal and installation procedures, you can confidently replace your pedals without damaging your bike. Start inspecting your current pedals today and upgrade your BMX setup for a better riding experience.
FAQs
Can I change BMX bike pedals without a pedal wrench?
Yes, some BMX pedals use Allen keys instead of pedal wrenches.
Why does the left BMX pedal have reverse threads?
Reverse threading prevents the pedal from loosening during riding.
Should I grease BMX pedal threads?
Yes, grease prevents corrosion and simplifies future removal.
How long does changing BMX bike pedals take?
Most riders can complete the process within twenty to thirty minutes.
Are all BMX bike pedals compatible with every BMX bike?
Most modern BMX bikes use standard 9/16-inch pedal threads.

Welcome to outdoorxsports.com! I’m Russell, your guide to the awesome world of mountain biking. This blog is all about building a community of riders who love to share their passion for the sport. Expect inspiring stories, local trail recommendations, fun challenges, and tips for making the most of your time on two wheels.