
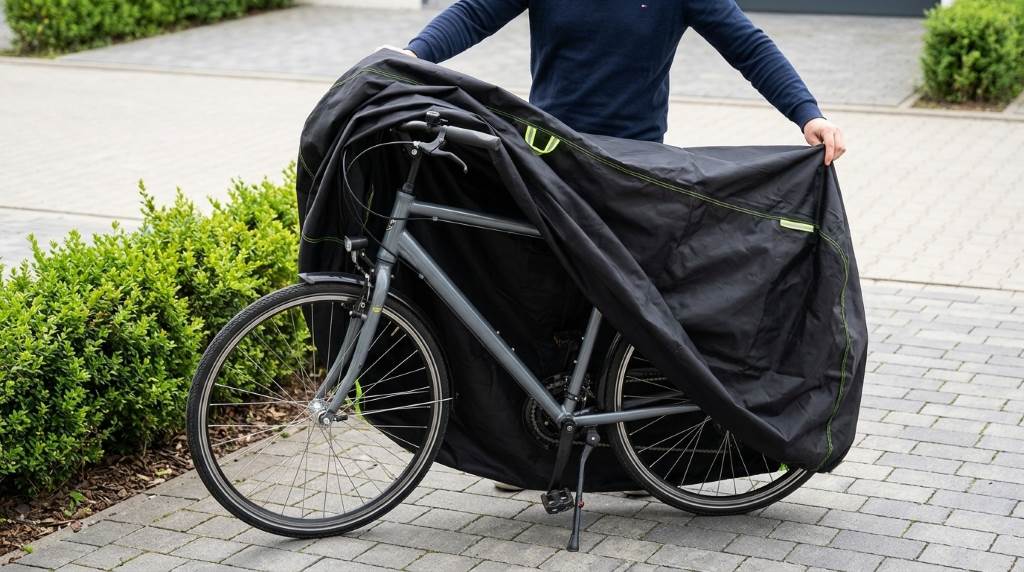
Secure the Topcrown cover by fitting its elastic hem tightly, fastening the wheel buckles, and using the built-in lock holes when appropriate. For outdoor storage, the Topcrown waterproof bike cover works best when you remove loose sections that wind can catch. The cover uses 210D material and offers a stated 3000mmH₂O water-resistance rating. Its XL version measures about 79 by 28 by 43 inches for one bike.
Key Takeaways
- Choose the correct cover size before tightening anything.
- Center the cover evenly over the entire bicycle.
- Secure the elastic hem around the lower bike area.
- Fasten every wheel buckle without leaving loose straps.
- Use the lock holes carefully to add theft resistance.
- Check the cover after strong wind, rain, or temperature changes.
Start With the Right Fit
A secure cover starts with correct sizing rather than aggressive tightening. The Topcrown range includes different sizes for one, two, and three bicycles.
Before installation, measure your bike from the highest handlebar point to the lowest tire point. Then measure its overall length and handlebar width. Choose a cover that provides complete coverage without creating excessive fabric around the wheels.
An oversized cover can catch more wind than necessary around exposed areas. Conversely, an undersized cover can pull against components and leave sensitive sections exposed. Therefore, aim for complete coverage with moderate fabric tension.
Prepare the Bike Before Covering It
Park the bicycle on stable, level ground before installing the cover. Avoid placing it where branches, sharp fencing, or rough walls can contact the fabric.
Also remove accessories that could create unnecessary pressure beneath the cover. Lights, pumps, baskets, mirrors, and bags can create protruding points. These points may stretch the material when wind repeatedly pushes against the cover.
If the bicycle has recently been ridden through rain, allow wet components to drain first. Wiping mud from the frame also prevents abrasive particles from rubbing against the paint. A clean bicycle gives the cover a better surface for long-term protection.
Position the Cover Correctly
Start by identifying the front and rear sections before pulling the cover over the bicycle. Then place the cover over the handlebars and gradually work it toward the wheels.
Keep the cover centered from left to right as you pull it downward. Make sure both wheels receive similar coverage. Uneven positioning can leave one side exposed while placing unnecessary tension on another section.
Next, check that the fabric does not press tightly against sharp pedals or exposed drivetrain components. Adjust the cover gently instead of forcing it into position. This simple step reduces unnecessary stress on the material.
Use the Elastic Hem for the First Layer of Security
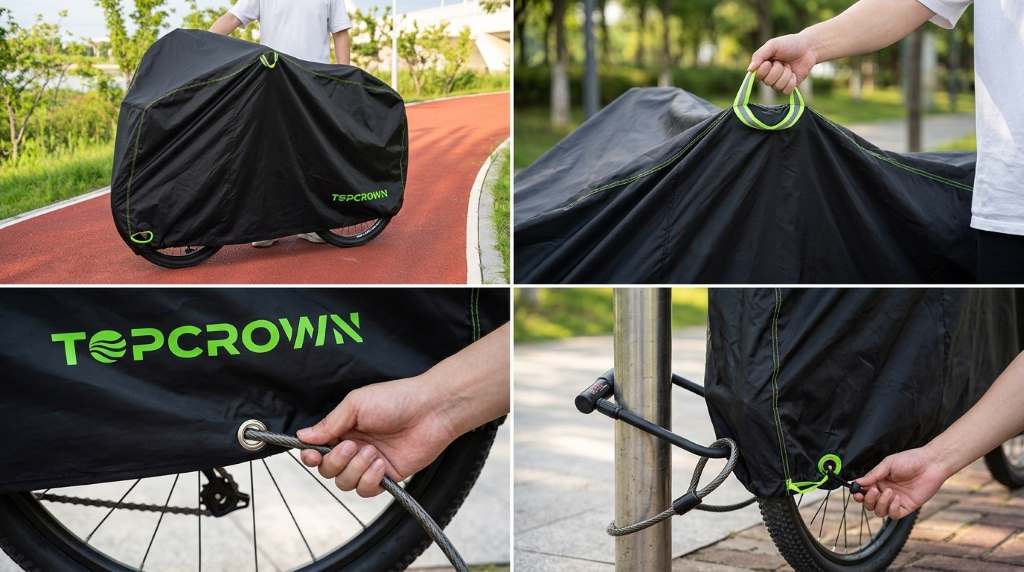
The elastic bottom hem creates the first important barrier against wind movement. Pull it evenly around the lower portion of the bicycle before fastening additional restraints.
Work around the bike rather than pulling one section extremely tight. This approach distributes tension more evenly across the cover. It also helps prevent one corner from lifting during gusty conditions.
After fitting the hem, walk around the bicycle once. Look underneath the cover and check for large openings where wind could enter. Correct those openings before securing the remaining attachment points.
Fasten the Wheel Buckles Properly
The wheel buckles provide another important layer of stability during outdoor storage. Secure each buckle around the appropriate wheel area without twisting the strap.
Pull the strap until the cover sits firmly against the bicycle. However, avoid extreme tension that compresses the fabric unnecessarily. A firm connection should prevent movement while still allowing the material to flex.
After fastening both sides, gently move the cover by hand. If the fabric shifts dramatically, tighten the relevant buckle slightly. If the material barely moves, your tension is generally sufficient.
Why Loose Straps Cause Problems
Loose straps allow wind to enter underneath the cover and inflate it. Repeated inflation creates flapping, rubbing, and unnecessary stress around seams.
Therefore, inspect every strap after installation rather than checking only the most visible buckle. Small adjustments can significantly reduce movement during windy weather.
Use the Lock Holes Carefully
Some Topcrown versions include nylon and metal lock-hole options designed around the lower wheel area. These openings can help combine cover protection with bicycle locking.
Thread a suitable bicycle lock through the designated opening and a strong part of the bicycle. Avoid attaching the lock only through removable accessories or thin cover material.
The cover itself should never become your primary anti-theft device. Instead, use a quality U-lock, chain lock, or comparable bicycle security system through a secure frame location.
Also check the lock-hole area after installation. Make sure the lock does not pull sharply against the fabric. If it creates constant tension, reposition the cover before leaving the bicycle unattended.
Secure the Cover Against Wind
Wind represents one of the biggest threats to any lightweight outdoor bicycle cover. Even waterproof material can suffer when repeated gusts cause continuous movement.
First, eliminate unnecessary slack around the wheels and lower frame. Next, secure every available buckle and attachment point. Finally, position the bicycle away from exposed corners whenever possible.
For particularly windy locations, place the bicycle behind a solid barrier without blocking ventilation completely. A wall, shed, or protected patio can reduce direct wind pressure. However, never place the cover against abrasive surfaces that can damage the fabric.
Do Not Add Random Heavy Objects
Placing bricks, stones, or other heavy objects directly on the cover may seem convenient. However, those objects can create concentrated pressure and damage the waterproof material.
Instead, use the cover’s intended attachment points whenever possible. If additional restraint becomes necessary, use soft straps that distribute pressure across stronger areas.
Check for Water Entry After Rain
A waterproof cover should shed water rather than collect large pools on its upper surface. Correct positioning helps water flow away from the bicycle instead of creating concentrated weight.
After heavy rain, inspect the top and lower edges for standing water. Also check whether wind has shifted the cover away from the wheels. Recenter the cover immediately if any section has moved.
Remember that waterproof protection depends on maintaining the fabric and its seams. Dirt, abrasion, and repeated mechanical stress can eventually reduce performance. Regular inspection therefore matters as much as initial installation.
Protect the Cover From Abrasion
A secure cover can still fail prematurely when it repeatedly rubs against rough bicycle components. Pay particular attention to pedals, chainrings, racks, brake components, and sharp accessories.
If a component creates noticeable pressure, reposition the cover around that area. For unusually sharp contact points, consider using a soft protective layer underneath. This prevents concentrated rubbing without requiring excessive cover tension.
Never drag the covered bicycle across the ground by pulling the cover. That action can stress seams and accelerate surface wear. Lift or move the bicycle using its frame instead.
Use a Simple Security Check Before Leaving
A thirty-second inspection can prevent many common cover problems. Walk around the bicycle and check each critical attachment point before leaving it outdoors.
- Confirm the cover completely surrounds the bicycle.
- Check that the elastic hem sits evenly.
- Fasten every available wheel buckle.
- Remove excessive slack from exposed areas.
- Confirm the lock passes through a suitable bicycle component.
- Check that no sharp part pulls against the fabric.
- Make sure the bicycle remains stable on its stand.
After completing these checks, gently test the cover with your hand. It should remain stable without feeling stretched excessively. This quick test provides a practical final confirmation.
How to Secure the Cover During Severe Weather
Strong storms require more attention than ordinary outdoor storage. Move the bicycle into a garage, shed, or enclosed area whenever severe weather becomes reasonably predictable.
If indoor storage remains impossible, choose the most sheltered outdoor position available. Keep the bicycle away from open fields, roof edges, loose branches, and narrow wind corridors.
Then inspect the buckles and hem again after the weather passes. Wind can gradually loosen restraints even when the original installation looked secure.
Common Mistakes That Make the Cover Less Secure
Many cover failures happen because owners focus only on waterproofing. Security requires proper fit, tension, positioning, and regular inspection as well.
- Using the wrong size: Excess fabric creates more opportunity for wind movement.
- Ignoring the bottom buckles: The lower section can lift when wind enters underneath.
- Overtightening straps: Excessive tension can stress attachment points unnecessarily.
- Leaving accessories exposed: Exposed areas can allow rain and dirt to reach the bicycle.
- Locking only the cover: A cover cannot replace a proper bicycle lock.
- Ignoring abrasion: Repeated rubbing can weaken fabric around contact points.
Correcting these mistakes improves both weather protection and long-term cover durability. More importantly, each adjustment takes only a few moments.
Storage Habits That Extend Cover Life
Proper storage matters when you remove the cover after outdoor use. Shake off loose dirt and allow moisture to leave the material before folding it.
Never pack the cover while it remains soaked for extended periods. Trapped moisture can create unpleasant odors and encourage surface deterioration. Instead, dry it thoroughly in a clean, shaded location.
Once dry, fold the cover loosely enough to avoid unnecessary creasing. Store it inside the supplied storage bag or another clean, dry container. The Topcrown design includes a storage bag for convenient organization.
When Should You Replace the Cover?
Replace the cover when you notice significant tears, failing attachment points, or persistent waterproofing problems. Small cosmetic marks do not automatically mean the cover requires replacement.
Inspect seams, lock holes, elastic sections, and buckle attachment areas periodically. These locations experience repeated tension and deserve closer attention.
If water repeatedly reaches the bicycle despite correct installation, investigate the cover before assuming the bike caused the problem. A damaged surface or compromised seam may explain the change.
A Practical Securing Routine
For regular outdoor storage, use the same installation sequence every time. Consistency reduces forgotten steps and makes problems easier to identify.
- Park the bicycle securely in a sheltered position.
- Remove sharp or unnecessary accessories.
- Center the cover over the entire bicycle.
- Pull the elastic hem evenly around the lower section.
- Fasten each wheel buckle and remove excessive slack.
- Use the appropriate lock hole with a proper bicycle lock.
- Perform a final wind and abrasion check.
This routine takes little time once it becomes familiar. More importantly, it addresses the points where wind, rain, and movement usually create problems.
Frequently Asked Questions
How do I stop a Topcrown bike cover from blowing away?
Center the cover, tighten its elastic hem, fasten the wheel buckles, and store the bike in a sheltered position.
Can I lock my bike while using the Topcrown cover?
Yes, compatible Topcrown versions provide lock holes that can work with an appropriate bicycle lock.
Should the Topcrown cover touch the ground?
No, keep the lower edge close to the bike without allowing excess fabric to drag across the ground.
Can I leave the cover outside during strong storms?
You can secure it carefully, but indoor storage offers better protection when severe weather becomes predictable.
How can I make the cover last longer?
Keep it clean and dry, prevent sharp contact, avoid dragging it, and inspect attachment points regularly.
Final Thoughts
Securing a Topcrown waterproof bike cover requires more than simply pulling fabric over your bicycle. Proper sizing, balanced positioning, firm buckles, controlled tension, and sensible locking create a much stronger setup.
Before leaving your bicycle outdoors, complete the quick security check described above. If you follow the same routine consistently, you can reduce wind movement and improve everyday weather protection.
For the best results, inspect your cover regularly and move the bicycle indoors whenever severe conditions allow. Take those few extra minutes before every long storage period, and your cover can work more effectively for longer.
Welcome to outdoorxsports.com! I’m Russell, your guide to the awesome world of mountain biking. This blog is all about building a community of riders who love to share their passion for the sport. Expect inspiring stories, local trail recommendations, fun challenges, and tips for making the most of your time on two wheels.