

Riding a bike with the wrong seat height can lead to discomfort or even injury. Studies show that 60 percent of cyclists experience knee pain due to poor seat adjustment. The Huffy Stone Mountain Bike for Men and Women offers a smooth ride but only if the seat fits your body. Adjusting the seat is simple and takes only a few minutes. A well-set seat improves control and makes every ride more enjoyable.
Why Seat Adjustment Matters for Comfort and Performance
A properly adjusted seat reduces strain on your knees and back. It also helps you pedal more efficiently. Many riders overlook this step and end up with aches after long rides. The right height lets your legs extend fully without locking your knees. This small change can make a big difference in your riding experience.
Poor seat height can cause hip discomfort and numbness. It may also lead to inefficient pedaling and faster fatigue. Adjusting the seat ensures your weight is balanced over the bike. This balance helps you maintain control on rough trails. Comfort and performance go hand in hand with the right setup.
Tools You Will Need for the Adjustment
You only need a few basic tools to adjust your seat. A hex wrench or Allen key is the most common tool for this job. Some bikes may require a standard wrench instead. Check your bike’s seat clamp to see which tool fits. A measuring tape can help you find the right height.
If your bike has a quick-release lever, no tools are needed. Simply flip the lever to loosen the seat post. Always carry a small toolkit when riding in case adjustments are needed. These tools are lightweight and easy to store. They ensure you can make changes anytime and anywhere.
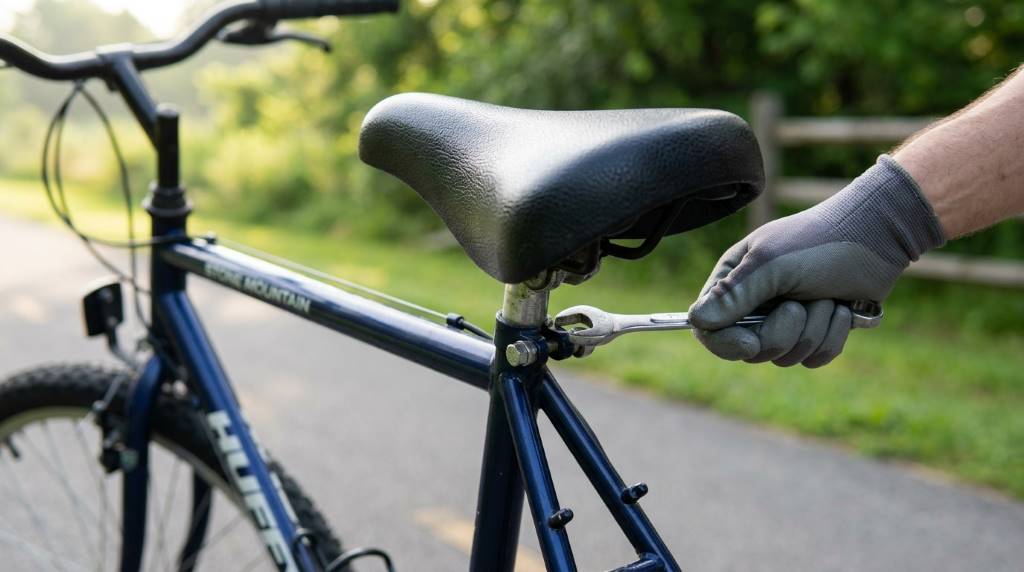
Step-by-Step Guide to Adjusting Your Seat Height
Step 1: Locate the Seat Clamp
The seat clamp is usually found just below the seat. It holds the seat post in place inside the bike frame. Look for a bolt or a quick-release lever. This part is what you will loosen to adjust the height. Make sure the bike is on a flat surface before you start.
Step 2: Loosen the Seat Clamp
Use your hex wrench or Allen key to turn the bolt counterclockwise. If your bike has a quick-release lever, flip it open. This will allow the seat post to move up and down. Do not remove the bolt completely as it may get lost. Just loosen it enough to let the seat slide.
Step 3: Adjust the Seat to the Right Height
Stand next to your bike and place the heel of your foot on the pedal. The pedal should be at its lowest point. Your leg should be straight but not locked. If your hip rocks, the seat is too high. Lower it until your foot rests flat on the pedal without rocking.
For a more precise method, measure your inseam and multiply by 0.883. This gives you the distance from the pedal to the seat. Use a measuring tape to set the height accurately. This method is popular among professional cyclists for optimal performance.
Step 4: Tighten the Seat Clamp
Once the seat is at the right height, tighten the clamp securely. Use your wrench to turn the bolt clockwise until it is snug. For quick-release levers, flip it back to the closed position. Check that the seat does not move when you push down on it. A loose seat can slip during a ride and cause accidents.
Step 5: Test the New Seat Height
Take a short ride to see how the new height feels. Pay attention to your knees and hips. If you feel any strain, stop and readjust. Small changes can make a big difference in comfort. It may take a few tries to find the perfect height for you.
How to Adjust Seat Angle for Maximum Comfort
The angle of your seat also affects comfort. A seat that is too far forward or backward can cause discomfort. Start with the seat level to the ground. This is a good neutral position for most riders. You can tilt it slightly forward or backward based on preference.
A slight forward tilt can help if you feel pressure on your hands. A backward tilt may be better if you slide forward while riding. Avoid extreme angles as they can cause discomfort. Small adjustments can help you find the perfect balance.
Unique Tips for Different Riding Styles
For Trail Riding
Lower the seat slightly for better control on rough trails. This allows you to move your body more freely. It also helps you absorb shocks from bumps and jumps. A lower seat gives you more stability during descents. You can raise it again for flat sections of the trail.
For Long-Distance Riding
A higher seat is better for long rides on smooth surfaces. It helps you pedal more efficiently and reduces fatigue. Make sure your legs can still reach the ground when stopped. Comfort is key for endurance riding.
For Urban Commuting
Set the seat at a height that lets you start and stop easily. This is important for city riding with frequent stops. A slightly lower seat makes it easier to put your foot down. It also gives you better control in traffic.
Common Mistakes to Avoid When Adjusting Your Seat
One common mistake is setting the seat too high. This can cause your hips to rock and lead to knee pain. Another mistake is not tightening the clamp enough. A loose seat can slip and cause accidents. Always double-check the tightness before riding.
Avoid adjusting the seat while riding. This can be dangerous and lead to loss of control. Always stop and make adjustments on stable ground. Also, do not ignore discomfort. If something feels wrong, stop and check your seat position.
How to Maintain Your Seat Adjustment Over Time
Check your seat height and angle regularly. Vibrations from riding can loosen the clamp over time. Tighten it if you notice any movement. Also, reassess your seat height if you change shoes or riding style. Small changes can keep you comfortable and safe.
Clean the seat post and clamp occasionally. Dirt and grime can make it harder to adjust. A little lubricant can help if the seat post sticks. This maintenance ensures smooth adjustments and a longer lifespan for your bike.
Safety Tips for Adjusting Your Seat
Always wear a helmet when testing a new seat height. Safety should be your top priority. Start with small adjustments to see how they feel. Large changes can throw off your balance and control. Ride in a safe area when testing new settings.
Avoid adjusting the seat on uneven or slippery surfaces. This can cause the bike to tip over. Also, make sure the seat post is inserted to the minimum safe depth. Most seat posts have a mark to show this depth. Never exceed the maximum height marked on the post.
Frequently Asked Questions
How often should I adjust my seat height?
Check your seat height every few weeks or if you feel discomfort.
Can I adjust the seat height without tools?
Yes, if your bike has a quick-release lever, you can adjust it without tools.
What is the best seat height for beginners?
Start with your heel on the pedal and leg straight but not locked.
How do I know if my seat is too high?
If your hips rock side to side, your seat is likely too high.
Does seat angle affect riding performance?
Yes, a slight tilt forward or backward can improve comfort and control.
Conclusion
Adjusting the seat on your Huffy Stone Mountain Bike is a simple but important task. It can greatly improve your comfort and performance. Take the time to find the right height and angle for your body. Small changes can make a big difference in your riding experience. Always prioritize safety and comfort when making adjustments.
Now that you know how to adjust your seat, get out and enjoy your ride. Share this guide with fellow cyclists to help them ride more comfortably. Happy cycling!

Welcome to outdoorxsports.com! I’m Russell, your guide to the awesome world of mountain biking. This blog is all about building a community of riders who love to share their passion for the sport. Expect inspiring stories, local trail recommendations, fun challenges, and tips for making the most of your time on two wheels.