
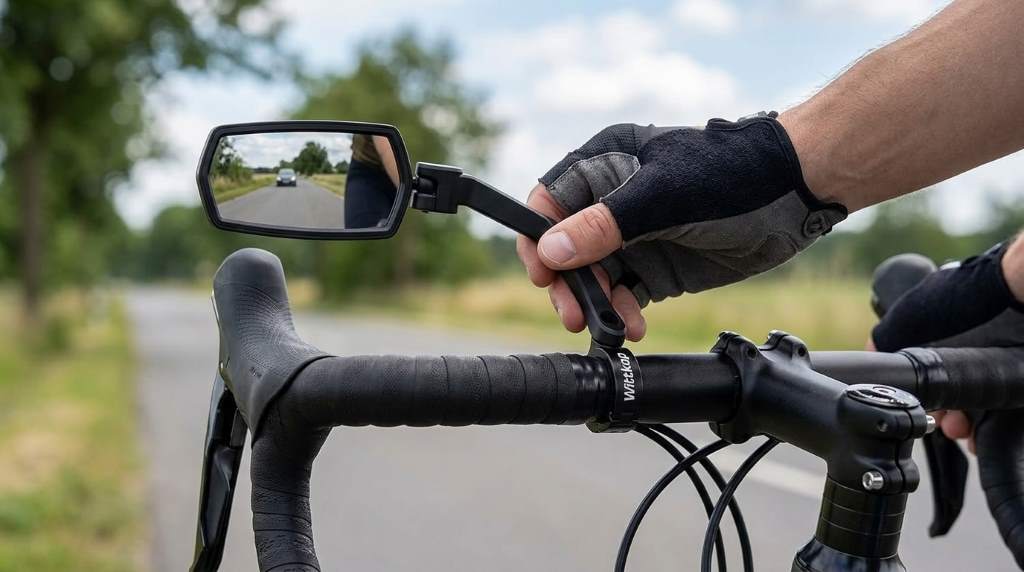
The best place to mount a Wittkop bike mirror is on the handlebar, near the grip, where your shoulder does not block the rear view. You can mount compatible Wittkop mirrors above or below the handlebar, depending on your riding position and available space. The mirror offers 360-degree adjustment, while its convex glass provides a broader rearward view. For most riders, placing it slightly outside the grip creates the clearest sightline without interfering with brake or shift controls. A properly positioned Wittkop bike mirror should show traffic behind you with only a small head movement.
Key Takeaways
- Mount the mirror near the handlebar grip for a clear rearward sightline.
- Choose above-bar or below-bar mounting according to your riding posture.
- Keep the mirror outside your shoulder line whenever possible.
- Leave enough clearance for brake levers, shifters, grips, and cables.
- Adjust the mirror after sitting naturally in your normal riding position.
- Test the view while riding before making final tightening adjustments.
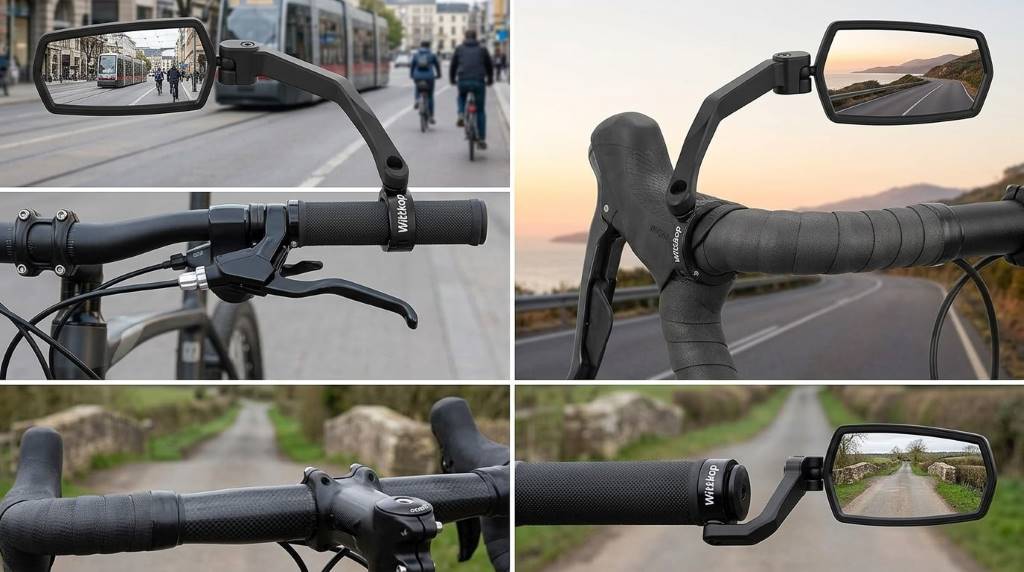
The Best Mounting Position For A Wittkop Mirror
For most bicycles, position the Wittkop mirror close to the left grip on the handlebar. This location gives you a natural rearward viewing angle without forcing your hand away from the controls. If your model supports either orientation, you can also mount it below the handlebar. Below-bar placement often creates a cleaner view for riders with upright handlebars.
However, the ideal position depends more on your body and bicycle than on a fixed measurement. Your shoulders, stem height, handlebar sweep, and riding posture all influence the final viewing angle. Therefore, treat the recommended position as a starting point rather than an absolute rule.
Why The Left Side Usually Works Best
The left side generally gives cyclists a practical position for monitoring approaching traffic. It also keeps the mirror away from many common right-hand control arrangements. Nevertheless, your bicycle setup may justify another position.
Choose the side that gives you the clearest uninterrupted rearward view. More importantly, keep your hands comfortably positioned on the grips while checking the mirror. A mirror becomes less useful when its placement forces you into an unnatural riding position.
Above-Bar Or Below-Bar Mounting?
Wittkop mirrors designed for flexible handlebar positioning can work above or below the bar. Both positions can provide excellent visibility when you correctly align the mirror. The better choice depends on your handlebar shape, shoulder position, and surrounding accessories.
| Mounting position | Best suited for | Main advantage |
|---|---|---|
| Above the handlebar | Flat or conventional handlebars | Easy adjustment and quick visual access |
| Below the handlebar | Upright bikes and crowded bars | Cleaner cockpit and lower mirror position |
| Near the grip | Most commuters and recreational riders | Strong rearward sightline with minimal reach |
| Farther inward | Wide handlebars or accessory-heavy setups | More clearance around the bar end |
When Above-Bar Mounting Makes Sense
Above-bar mounting works well when your handlebar provides enough open space near the grip. It also suits riders who prefer the mirror closer to eye level. This position can make initial adjustment especially straightforward.
Still, check your brake lever and shifter before tightening the clamp. The mirror should never restrict lever movement or interfere with cable routing. Leave enough room for your hands to move naturally during braking and shifting.
When Below-Bar Mounting Works Better
Below-bar mounting can solve several visibility problems caused by upright riding positions. It places the mirror lower, which may reduce obstruction from your shoulder or upper arm. It can also make a busy handlebar look less crowded.
However, do not place it so low that your arm constantly blocks the lens. Sit on the bicycle and check the mirror from your actual riding posture. That simple test usually reveals whether the lower position improves visibility.
How Far From The Grip Should You Mount It?
Mount the mirror close enough to the grip for stability, but leave adequate room for your hand. The clamp should sit on a firm section of handlebar rather than an unstable accessory or soft grip material. A secure mounting surface helps prevent unwanted movement during rough riding.
Avoid placing the mirror excessively close to the stem unless your handlebar design requires it. Moving the mirror too far inward can increase shoulder obstruction. Conversely, placing it too far outward can make the mirror vulnerable to accidental impacts.
Use Your Shoulder As A Visibility Test
Your shoulder provides one of the quickest ways to evaluate mirror placement. Sit normally, relax your arms, and look into the mirror without changing your posture. You should see the road behind you rather than a large portion of your shoulder.
If your shoulder occupies much of the mirror, reposition the mirror before changing its angle. A perfect lens angle cannot compensate for poor physical placement. Moving the mount slightly outward or downward often solves the problem.
Check Handlebar Compatibility Before Installation
Before mounting the mirror, inspect the available handlebar space around your chosen position. Look for brake levers, shifters, grips, lights, displays, bells, and other accessories. These components can limit how far you can rotate or position the mirror.
Curved handlebars require additional attention because the clamp may not sit evenly everywhere. A level mounting surface generally gives you better control over the mirror position. Therefore, test the clamp location before fully tightening anything.
Keep Controls Completely Free
Your mirror should never prevent full brake-lever movement or interfere with shifting. Check every control after installing the clamp. Then turn the handlebars fully left and right while inspecting cable clearance.
Also check the mirror when you stand beside the bicycle and fold it inward. A folding mirror should move without contacting cables, displays, or frame components. This small check can prevent damage during storage and transportation.
How To Mount The Wittkop Mirror Correctly
Start by placing the bicycle on stable ground where you can work comfortably. Loosen the mounting hardware enough to position the clamp around the handlebar. Do not fully tighten the hardware until you establish the correct viewing position.
- Choose the mounting side and identify a clear handlebar section.
- Position the clamp close to the grip without covering control hardware.
- Attach the mirror arm and loosely secure the mounting hardware.
- Sit on the bicycle in your normal riding position.
- Rotate the mirror until it shows the useful rearward area.
- Check your shoulder, arm, and handlebar accessories for obstruction.
- Tighten the mounting hardware securely without excessive force.
- Perform a final stability and visibility check before riding.
The important step involves adjustment from the saddle rather than from beside the bicycle. Your viewing angle changes significantly when your torso and arms assume their normal riding positions. Consequently, an apparently perfect setup can become ineffective once you start riding.
How To Adjust The Mirror For Maximum Rear Visibility
Begin with the mirror facing slightly outward from your body. Then tilt it until the road behind you fills most of the useful viewing area. Keep enough surrounding space to identify approaching vehicles without constantly moving your head.
Because the mirror uses a convex surface, objects can appear smaller than they do directly. Therefore, use the mirror primarily to detect traffic and assess its position. Always combine mirror information with appropriate awareness of your surroundings.
What You Should See In The Mirror
A useful setup should show the roadway behind you rather than mostly your torso. Ideally, you should see approaching traffic, cyclists, and meaningful portions of the lane. The exact field changes with your bicycle geometry and riding position.
If you see too much sky, tilt the mirror downward. If you see too much pavement, tilt it upward. Make small adjustments until the useful road area remains centered during normal riding.
Common Wittkop Mirror Mounting Mistakes
Many mirror problems originate from mounting location rather than mirror quality. Riders often tighten the clamp immediately, then discover that their shoulder blocks the view. Others place the mirror beside crowded controls and leave insufficient adjustment space.
- Mounting too far inward: Your shoulder may dominate the mirror image.
- Mounting too far outward: The mirror may become easier to hit or damage.
- Ignoring control clearance: Brake and shifting functions can become restricted.
- Adjusting while standing: The final viewing angle may fail during actual riding.
- Overtightening immediately: You lose the ability to make controlled positioning changes.
- Skipping the road test: Vibration and posture can reveal problems later.
How To Reduce Mirror Vibration
A properly secured clamp provides the foundation for a stable mirror. First, confirm that the mounting surface feels firm and the hardware sits correctly. Then check the mirror after riding across a short uneven section.
Some vibration can come from the bicycle itself rather than the mounting hardware. Wide handlebars, flexible components, rough roads, and high speeds can increase movement. If vibration persists, reassess the clamp position and hardware tightness.
Do Not Chase Perfect Stability With Excessive Force
Tightening hardware harder does not automatically create a better installation. Excessive force can damage components or complicate future adjustments. Instead, secure the clamp firmly while following the hardware and bicycle manufacturer’s guidance.
After tightening, gently test the mirror by hand before riding. The mirror should remain positioned when you apply moderate manual pressure. If it moves unexpectedly, correct the installation before entering traffic.
Best Position For Different Types Of Bikes
City bikes with upright handlebars often benefit from below-bar mounting. This arrangement can place the mirror outside your shoulder line while keeping the cockpit comfortable. It also works well when the handlebar already carries several accessories.
E-bikes often need extra attention because displays, throttles, lights, and control switches consume handlebar space. Mount the mirror where it remains accessible without interfering with electronic controls. A slightly different position can make a major difference on compact e-bike cockpits.
Touring bikes usually provide more handlebar space, but luggage and unusual hand positions can change the ideal setup. Choose a location that works across your primary hand positions. Check the mirror again after loading bags because your riding posture can change.
Mountain bikes require greater attention to impact clearance and movement. Keep the mirror away from areas likely to contact trees, walls, or other obstacles. A foldable setup can provide useful flexibility when navigating narrow trails or transporting the bicycle.
A Simple Five-Minute Positioning Test
You can find the best location without repeatedly removing the mirror. First, loosely attach it and sit on the bicycle in your normal posture. Then check the rear view while keeping both hands in their usual positions.
- Look straight ahead and relax your shoulders.
- Check whether your shoulder blocks the mirror.
- Confirm that brake and shift controls move freely.
- Rotate the mirror until the rear roadway becomes clear.
- Turn the handlebars and check for accessory interference.
- Secure the hardware and repeat the visibility check.
- Take a short test ride before making final adjustments.
This method works better than copying another rider’s mounting position. Every bicycle places the rider’s eyes, shoulders, and hands differently. Your safest position therefore comes from your own riding geometry.
What Competitor Guides Often Miss
Many bike mirror guides focus heavily on product features and basic installation steps. They often explain how to attach a mirror without explaining how to choose the exact mounting location. That distinction matters because correct installation does not guarantee useful visibility.
A stronger approach evaluates shoulder obstruction, control clearance, riding posture, accessory congestion, and vibration together. These factors determine whether the mirror remains genuinely useful after installation. They also explain why two riders can prefer completely different mounting positions.
Another commonly overlooked issue involves adjusting the mirror while seated. Riders frequently position mirrors while standing beside their bicycles, then discover poor visibility during real riding. Testing from the saddle creates a much more reliable final setup.
When Should You Reposition The Mirror?
Reposition the mirror whenever your rear view becomes difficult to read. You should also inspect it after changing handlebars, grips, brake levers, displays, or other cockpit components. Even a small equipment change can alter the viewing angle.
Recheck the mirror after transporting the bicycle or folding it for storage. Impact and repeated folding can gradually change its position. A quick pre-ride inspection helps catch unwanted movement before you enter traffic.
Frequently Asked Questions
Where should I mount a Wittkop bike mirror?
Mount it near the handlebar grip where you can see behind you without your shoulder blocking the view.
Should a Wittkop mirror go above or below the handlebar?
Use whichever position gives you the clearest rear view while keeping your controls and hands unobstructed.
Which side should I mount the Wittkop mirror?
The left side usually provides a practical traffic view, but choose the side that suits your bicycle and riding position.
How do I know if my mirror sits too far inward?
If your shoulder occupies much of the mirror image, move the mirror outward or adjust its mounting position.
Should I adjust the mirror before tightening it?
Yes, loosely position the mirror first, adjust it from your riding posture, then secure the hardware firmly.
Final Thoughts
The best Wittkop mirror position combines a clear rear view, secure mounting, and unrestricted control access. Start near the grip, then choose above-bar or below-bar placement according to your bicycle geometry. Most importantly, adjust the mirror while sitting naturally on the bicycle.
Take a few minutes to test the setup before your next serious ride. If your shoulder blocks the view, your controls feel crowded, or vibration affects visibility, reposition the mirror. A carefully mounted mirror can make rearward awareness much easier without disrupting your normal riding habits.
Ready to install yours? Mount the mirror loosely, test the sightline from the saddle, make small adjustments, and secure it before riding.
Welcome to outdoorxsports.com! I’m Russell, your guide to the awesome world of mountain biking. This blog is all about building a community of riders who love to share their passion for the sport. Expect inspiring stories, local trail recommendations, fun challenges, and tips for making the most of your time on two wheels.