
Attention, cycling enthusiasts and adventure seekers! Have you ever found yourself in the middle of nowhere, surrounded by picturesque landscapes, only to realize that you forgot your Presta valve adapter? Fret not! In this blog, we’re going to reveal a little-known secret that will save your ride and keep those wheels rolling smoothly. Discover how to inflate the Presta valve without adapter and never let a missing tool ruin your cycling escapades again! We’ll dive into the nitty-gritty of this technique, guiding you through each step to inflating your Presta valve like a pro. Whether you’re a seasoned rider or a beginner, mastering this Presta valve inflation method will soon become an indispensable skill in your cycling repertoire. So, let’s embark on this inflation adventure and keep those tires ready for every journey that lies ahead! Ready to learn the art of inflating Presta valve without an adapter? Let’s get started!
Understanding Presta Valves
Before we dive into the methods, it’s essential to understand what Presta valves are and how they work. Presta valves are commonly found on high-performance bicycles, and they have a narrower profile compared to Schrader valves, which are more common on car tires. Presta valves have a threaded top and a valve stem that must be unscrewed before inflation.
Why Inflating Without an Adapter is Useful
Inflating your Presta valve without an adapter can be useful in emergencies or situations where you don’t have access to an adapter. It’s always a good idea to be prepared with alternative methods, as you never know when you might need them.
Here are why inflating without an adapter is useful:
- It’s faster. There’s no need to fumble with an adapter, which can save you time when you’re in a hurry.
- It’s more reliable. Adapters can sometimes leak, which can lead to inaccurate inflation readings. Without an adapter, you can be sure that you’re getting the correct air pressure in your tires.
- It’s more convenient. If you’re traveling, you may not have an adapter with you. Inflating without an adapter means you can still inflate your tires, even if you’re not prepared.
- It’s safer. Adapters can sometimes come loose, which can lead to the air hose coming off the tire. This can be dangerous, as it could cause the air to escape suddenly. Without an adapter, there’s no risk of this happening.
- It’s cheaper. Adapters can be expensive, so if you don’t need one, you can save money by inflating without it.
Of course, there are also some potential drawbacks to inflating without an adapter. For example, if your tire valve is damaged, you may not be able to get a good seal without an adapter. Additionally, if you’re not careful, you could overinflate your tire, which could be dangerous.
How to Use Presta Valve?
Here are the steps on how to use a Presta valve:
- Remove the dust cap. This is the small plastic cap that covers the valve.
- Unscrew the valve lock-nut. This is the small nut at the top of the valve. It will not come off completely, but you need to unscrew it far enough to expose the valve pin.
- Tap the end of the valve pin. This will release any built-up air pressure in the valve.
- Attach the pump head to the valve. If your pump does not have a Presta valve adapter, you can use one of those.
- Pump up the tire to the desired pressure. Be sure not to over-inflate the tire.
- Remove the pump head from the valve.
- Screw the valve lock-nut back into place.
- Replace the dust cap.
Getting Ready: How to Inflate a Presta Valve
Before attempting any inflation method, ensure your pump is compatible with Presta valves. Some pumps have dual compatibility, meaning they work with both Presta and Schrader valves, while others are specific to one type.
You’ll need specific household items for each of the following methods, so make sure you have them readily available before proceeding.
Before attempting any inflation technique, inspect the Presta valve for any damages or debris that could affect the process. Make sure it is clean and in good working condition.
Method 1: The Paperclip Hack
This simple and readily available method involves using a paperclip to inflate your Presta valve tire.
- Unfold Your Trusted Paperclip: Straighten out a paperclip until it forms a long, straight wire.
- Prepping the Valve Tip: Unscrew the top cap of the Presta valve and expose the small pin in the center.
- Securely Attaching the Paperclip: Carefully insert one end of the paperclip into the valve’s pinhole, ensuring a secure fit.
- Pumping Up the Tire: With the paperclip in place, attach your pump and inflate the tire to the desired pressure.
- Removing the Paperclip Safely: After inflation, gently remove the paperclip, ensuring not to damage the valve.
Method 2: The Ballpoint Pen Trick
You’ll need an empty ballpoint pen to act as an improvised adapter for this method.
- Locate a Ballpoint Pen: Find an empty ballpoint pen with a hollow barrel.
- Removing the Pen Insert: Take apart the pen, removing the ink insert to create a hollow tube.
- Fitting the Pen onto the Valve: Unscrew the Presta valve cap, and then slide the hollow pen tube over the valve.
- Inflating with the Modified Pen: Attach your pump to the pen tube and inflate the tire.
- Reassembling the Pen: Once inflated, remove the pen tube carefully and reassemble the pen.
Method 3: The Straw Solution
This method utilizes a straw to create an adapter-like effect.
- Acquire a Suitable Straw: Find a thin straw that fits snugly over the Presta valve.
- Modifying the Straw: Trim the straw’s end at a 45-degree angle to facilitate a better seal.
- Applying the Straw to the Valve: Slide the modified straw over the valve and press it down securely.
- Pumping Air with Precision: Attach your pump to the straw, ensuring a tight fit, and start inflating the tire.
- Removing the Straw: Once the tire is inflated, gently remove the straw.
Method 4: The Press-and-Inflate Approach
This technique uses your thumb to create a temporary seal for inflation.
- Understanding the Press-and-Inflate Technique: Press the valve pin down slightly to release a small amount of air and create a temporary seal.
- Using Your Thumb to Open the Valve: Press down on the valve pin with your thumb and keep it pressed.
- Inflating the Tire with Your Pump: Attach your pump to the valve while pressing your thumb down.
- Closing the Valve: Release your thumb from the valve pin to close the valve after inflation.
Method 5: The Thumb Push Method
Another method involving your thumb, this one is simple and effective.
- Getting Ready to Use Your Thumb: Unscrew the valve cap and get ready to use your thumb.
- Pushing Down on the Valve: Press down on the valve pin with your thumb to open it.
- Safely Releasing the Air: Press down firmly on the tire with your other hand to release air into the tire.
- Repeating the Process: Repeat the thumb press and release process until the tire is fully inflated.
Method 6: The Two-Wheelers’ Classic
This technique is a favorite among many cyclists and involves using your fingernail as an adapter.
- Tapping into the Biking Community Secret: Many cyclists carry a short fingernail just for this purpose.
- Using Your Fingernail to Open the Valve: Insert your fingernail under the valve’s top cap and unscrew it.
- Inflating the Tire: Attach your pump and inflate the tire to the desired pressure.
- Closing the Valve: Screw the top cap back onto the valve after inflation.
Method 7: The Medical Syringe Hack
A clean medical syringe can also serve as an adapter substitute.
- Sourcing a Clean Medical Syringe: Obtain a clean syringe without a needle.
- Preparing the Syringe: Depress the plunger fully and ensure it’s clean and dry.
- Attaching the Syringe to the Valve: Fit the syringe opening over the valve and create a tight seal.
- Injecting Air into the Tire: Gradually push the plunger to inject air into the tire.
- Detaching the Syringe: After inflation, carefully remove the syringe.
Method 8: The Zip Tie Solution
This method involves using a zip tie to create an adapter-like seal.
- Obtaining a Zip Tie: Find a zip tie long enough to encircle the valve.
- Inserting the Zip Tie into the Valve: Insert one end of the zip tie into the valve’s opening.
- Creating an Air-Seal: Tighten the zip tie around the valve to create a secure seal.
- Pumping Air into the Tire: Attach your pump to the zip tie and inflate the tire.
- Removing the Zip Tie: After inflation, carefully remove the zip tie.
Method 9: The Straw and Rubber Band Combo
A straw and rubber band combination can also be used as an improvised adapter.
- Combining Two Household Items: Find a straw and a rubber band.
- Attaching the Straw with a Rubber Band: Securely attach the straw to the valve using the rubber band.
- Connecting the Straw to the Valve: Slide the straw over the valve, ensuring a snug fit.
- Inflating the Tire: Attach your pump to the straw and start inflating the tire.
- Detaching the Straw: After inflation, gently remove the straw.
Method 10: The Balloon Adapter Alternative
Using a balloon as an adapter is a clever hack.
- Understanding Balloon Adapters: Balloons can act as a makeshift adapter for Presta valves.
- Making a DIY Balloon Adapter: Cut a small piece of the deflated balloon and stretch it over the valve.
- Fitting the Balloon Adapter to the Valve: Ensure the balloon fits snugly over the valve.
- Inflating with Ease: Attach your pump to the valve with the balloon adapter and start inflating.
Method 11: The Presta-to-Schrader Conversion
This method involves temporarily converting your Presta valve to a Schrader valve.
- Exploring Presta-to-Schrader Adapters: Purchase a Presta-to-Schrader adapter from a bike shop.
- Converting Your Valve Temporarily: Screw the adapter onto the Presta valve.
- Inflating the Tire with Schrader Pump: Now, you can use a Schrader pump to inflate the tire.
- Reverting to Presta Valve: Remove the adapter to revert to Presta valve mode after inflation.
Safety Precautions
- Don’t Overinflate Your Tire: Be cautious not to overinflate your tire, as it may lead to blowouts or damage.
- Inspect for Leaks: Check for leaks around the valve or tire after inflation.
- Regularly Check Valve Integrity: Ensure your Presta valve is in good condition to prevent any issues while inflating.
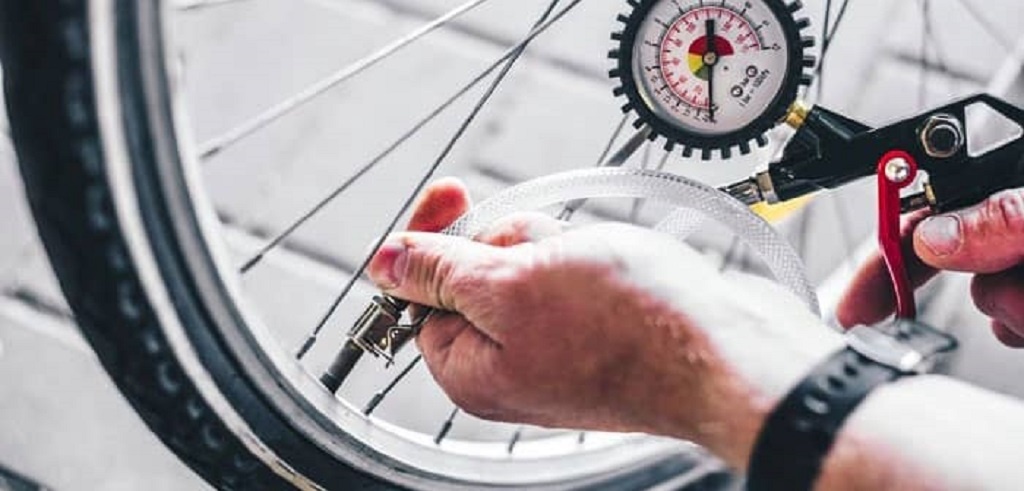
How to Fill a Presta Valve?
To fill a Presta valve, follow these steps:
- Gather the necessary equipment: You’ll need a bicycle pump with a Presta valve adapter, which is sometimes included with the pump or can be purchased separately.
- Remove the valve cap: Unscrew the small cap on the end of the Presta valve. Keep it somewhere safe so you don’t lose it.
- Prepare the valve: To allow air to flow into the valve, you’ll need to loosen the valve nut at the top of the valve stem. Turn it counterclockwise until it is loose enough.
- Attach the pump: Take your bicycle pump and, if necessary, insert the Presta valve adapter into the pump’s head. The adapter is a small metal piece that fits onto the end of the valve.
- Secure the pump: Place the pump head (with the adapter, if needed) onto the valve firmly, ensuring a tight seal.
- Inflate the tire: Start pumping air into the tire by pushing and pulling the pump handle. You’ll see the pressure on the gauge if your pump has one. If not, gauge the tire’s firmness by feeling it with your hand. The desired pressure is usually indicated on the sidewall of the tire or in your bike’s manual.
- Monitor the pressure: As you pump, be careful not to overinflate the tire. Presta valves have a lock mechanism that prevents air from escaping when you remove the pump. You can also press the valve down to release a small amount of air to gauge the pressure.
- Detach the pump: Once you’ve reached the desired tire pressure, remove the pump head by loosening it gently and pulling it off the valve.
- Tighten the valve nut: Turn the valve nut clockwise to secure it in place. This helps prevent air from leaking out during your ride.
- Replace the valve cap: Screw the small-cap back onto the end of the Presta valve to protect it from dirt and debris.
Conclusion
Mastering the art of inflating Presta valves without an adapter opens up possibilities for every cycling enthusiast. No longer bound by the limitations of missing or misplaced tools, you can confidently embark on your adventures knowing that you hold the secret to keeping those wheels rolling. With our comprehensive guide on how to inflate Presta valves, you’ve gained valuable insights into this essential skill, whether you’re a seasoned rider or just starting your cycling journey.
So, the next time you find yourself in a picturesque landscape or a remote trail, don’t let a missing adapter halt your exploration. Remember these steps and techniques for inflating Presta valves, and you’ll be well-prepared for any situation. Embrace the freedom and confidence of this newfound knowledge, and let your cycling escapades reach new heights. So, gear up, grab your pump, and let the adventures roll on! Happy cycling!
FAQs
Can I use these methods on any Presta valve tire?
Yes, these methods are generally applicable to any Presta valve tire.
Are there any risks associated with inflating without an adapter?
As long as you follow the safety precautions, the risks are minimal. Just be careful not to overinflate or damage the valve.
Can I revert to using an adapter after using these methods?
Absolutely! You can always use a standard adapter for regular inflation.
What if I don’t have any of the household items mentioned in the methods?
In that case, consider carrying a small adapter with you during your rides to avoid any inconvenience.
How do I know if my pump is compatible with Presta valves?
Check the product specifications or consult the manufacturer to ensure compatibility. Some pumps come with both Presta and Schrader compatibility.
Remember to enjoy the journey, stay safe, and happy cycling!

Taylor is an outdoors & sports equipment specialist, sports author, bike traveler, bicycling and skating expert, and smoke-free ride activist. He is also a regular reviewer of outdoor sports gadgets and accessories. About safety gear and biking facts he analyzes and gives his feedback to outdoorxsports. Writes and tests to help him, you, and us.